

.svg.png)


Word display conditions
Bring dynamism to your template by creating conditions for displaying paragraphs, images, or any element in your document.
We are going to break down the training into 2 simple steps :
- Creation of a simple condition to understand the principle
- See real use cases that we encounter regularly
Prerequisites
✓ Have a template already prepared with a main object and a child object (optional)
✓ Work on a Word template - this feature is not available in Google Docs
Dans quel cas faire une condition ?
A condition allows you to display or not display text, an image, a table, and other elements based on a criterion found in Salesforce. This is very useful to add a legal paragraph in the T&Cs based on a checkbox, for example in Salesforce, or to hide a part that shows the possible discounts when no discount has been applied in a quote.
Elle peut être basée sur le champ d'objet principal, un objet parent, un objet enfant, une case à cocher, une devise ou une picklist et peut afficher du texte, un chiffre, une image statique ou dynamique, un pyctogramme, un tableau, d'autres balises ou un vide.
The idea is to personalize a template without multiplying the number of different templates.
Note
The IF condition is only compatible with document templates in Word format. It is therefore not compatible with PDF, PowerPoint, or Excel templates.
Simple display condition
The logic in our example will be simple, we want to display the word “Apple” when the checkbox on the “Show the word Apple” account is checked.
La syntaxe fonctionne de la manière suivante :
{ IF "{!Object|Field}" = "Expected value"
"result if true" "result if false" MERGEFORMAT }
It consists of 4 elements:
The decision tag is the Salesforce criterion on which the decision is based. It is the evaluated Salesforce field that carries the value to be tested.
The operator defines how to compare the tag to the expected value. It can be equal to =, not equal to <>, greater than >, greater than or equal to >=, or less than or equal to <=.
The expected value is what the field is compared against. Except for currency, it is not enclosed in "".
The text if true and text if false represent exactly what will be displayed in the document depending on the result. It can contain text, tags, images, tables, icons, pages, paragraphs, or be empty "" to display nothing.
MERGEFORMAT is optional and standardizes the format of the displayed text.
First, define the logic you want to apply and the decision tag to base it on.
- Think about the logic you want
Simple condition (Value A or B)
Trigger a condition based on a single criterion
Ex: Display the word "apple" if the "Display apple" checkbox is selectedAdvanced condition (AND, OR, AND + OR)
Trigger a condition based on multiple criteria
Ex: Display a specific clause if the client is a Key Account and the opportunity amount is greater than €100,000Nested condition
Trigger a condition within the result of another condition
Ex: Display logo A if the brand is A, or if the brand is B display logo B, otherwise display logo C - Find the document template on which you want to make the condition
- Make sure that the main object & the child objects (optional) are properly configured
- Open the assistant from the document template
- Using the assistant, find the Salesforce field that will be the basis of your condition
- Click on the 3 small dots at the end of the line
- Click on “Add a condition”
- I complete the logic by entering the word “Apple” in the “True” box (True = Box checked)
- Click on “Copy”
- Click on the “Insert” tab on the word ribbon
- Click on “Fields...” or “Insert Field”
- In the pop-up, paste the condition into the editable field, replacing the = sign already present.
- Finalize by clicking on “Ok”
- Click on the "Insert" tab in the Word ribbon.
- Click on "Quick Parts," then on "Field..."
- In the pop-up, paste the condition into the "Formula:" field, replacing the = sign already present.
- Finalize by clicking "OK."
Caution
A condition must be inserted using the method described below. Copying and pasting the condition as-is into the document will not trigger it.
For a condition using the = operator, the result for "False" is displayed by default in the document. If your "False" result is empty, your condition will display nothing when closed.
Note that it is the condition if false that will be displayed by default in the template but that the condition will execute according to our criterion at the time of generation.
You can "open your conditions" to understand their structure or to enhance the true/false results with custom content.
- From your condition or by selecting your entire template, right-click > "Toggle Field Codes."
- Find the condition in its raw form:
{ IF "{!Quote|Afficher_pomme__c}" = "true" "Apple" "" MERGEFORMAT } - The condition contains two areas between quotation marks at the end: the result if true and the result if false. These are the only parts you should modify. Everything else is the structure of the condition. Do not touch it.
- Between these quotation marks, you can write plain text, include multiple paragraphs, insert images, tables, other Gonexa tags, or leave it empty. The content can span multiple pages, and its formatting can be customized in Word.
- Once your condition has been enhanced, close it by right-clicking and selecting "Update Field." You will see the result for true or false appear.
Caution
The IF condition is sensitive. The slightest modification outside the result areas can invalidate it. Before editing, enable formatting marks (¶) in Word to clearly visualize the boundaries of each area and avoid errors.
{ IF "{!Account|Checkbox_pomme}" = "true" "Editable result if true" "Editable result if false" }
- Upload your template with the condition as usual when loading a new version
- Find a record that matches your criteria (We check the box “Show the word Apple” on our account for the example)
- Generate a document to validate that the condition works well
- Systematically test all the alternatives for your condition to ensure that it has been well built
Tip
To get the cleanest and most reliable results, keep these best practices in mind:
Preview before finalizing or adding complexity
Always perform a test merge to confirm that IF statements display correctly or to build complexity into an existing condition step by step.
Watch out for extra spaces
Word is sensitive to spacing. Even small errors can break conditions. Ensure there are no typos.
Keep conditions simple
Overly complex nested IFs can become difficult to maintain, scale, or hand off to another administrator.
Use cases
Find several pre-designed simple condition templates to reuse and customize.
Conditions can be based on a main object, parent object, child object, checkbox, currency, or picklist, and can display text, numbers, static or dynamic images, icons, tables, other tags, or nothing at all.
Important
A tag cannot be based on a rich text field or a date.
The expected value cannot be an image or an icon. It must strictly match the value returned by Salesforce at the time of generation (e.g., "€0.00" and not 0 or null...).
Any discrepancy, however minor (format, symbol, space, capitalization, etc.), will prevent the condition from working correctly.
Modèle d'exemple de condition
Find the simple IF condition template to download pre-made examples that you can customize.

Exemple de conditions populaires
Discover the most popular simple conditions.
Assuming you already have a template created, follow these steps:
- Ensure you have a main object and a child object properly configured.
- Open the wizard from the document template.
- Search for the checkbox field to which you want to add a condition.
- Click the three dots and add a condition.
- Enter "0" as the expected value.
- In the "if true" text field, write a word such as T&Cs.
- In the "if false" text field, leave it blank.
- Copy the condition.
- From your document template, access the menu to insert a field via "Insert/Field" or from "Quick Parts" > "Field...".
- Paste the condition into the editable area and confirm.
- Select the condition or the entire document (Ctrl + A) and right-click "Toggle Field Codes" to open the condition in its raw format:
{ IF "{!Quote|CGV_cochees__c}" = "true" "CGV" "" MERGEFORMAT } - From the open condition, replace the text "CGV" with your T&Cs and customize the layout as you wish.
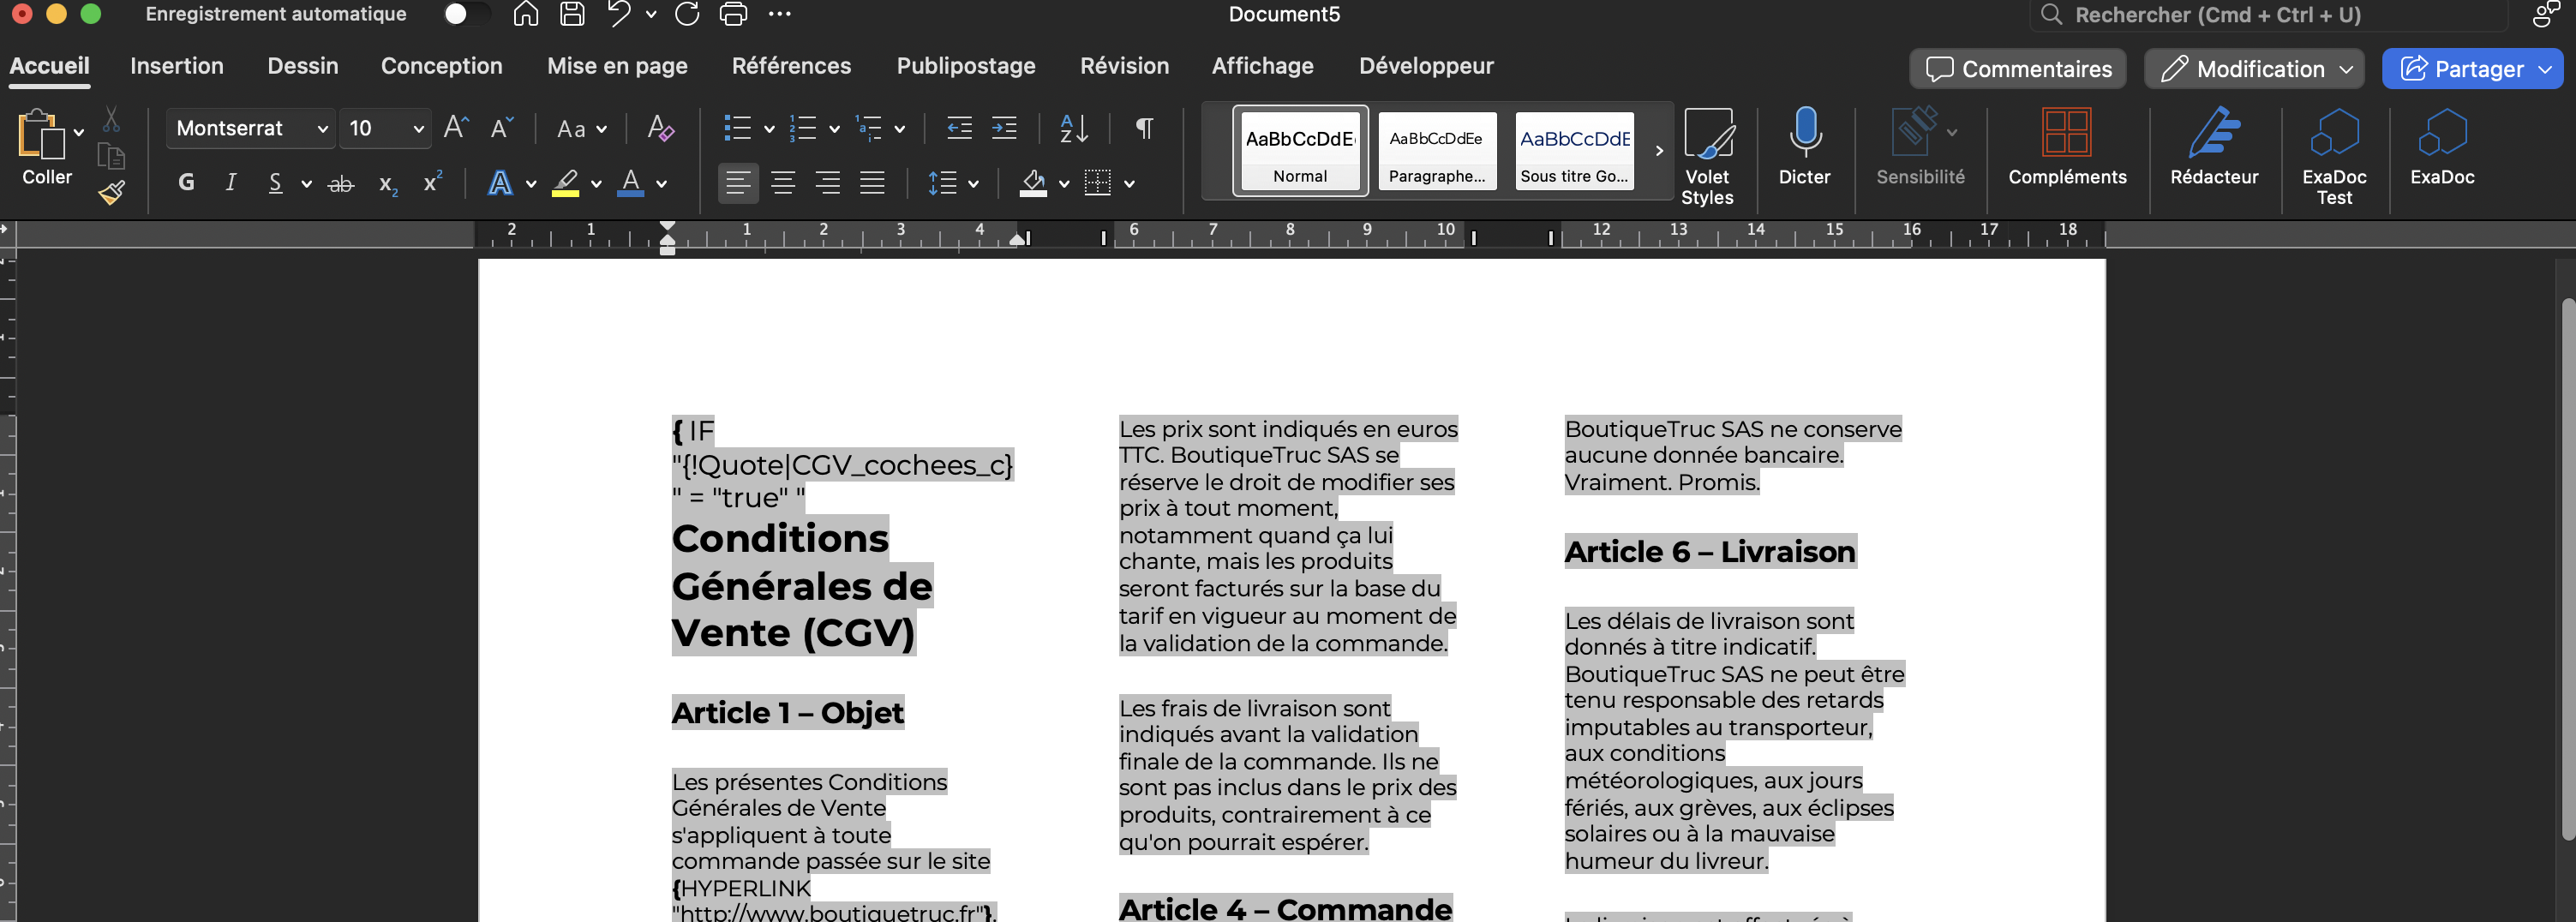
Tip
Between the quotation marks (""), you can enter any content you like: text, special characters, or Word-compatible formatting elements (line breaks, page breaks, section breaks, multi-column layouts, etc.). - Close the condition by clicking "Update Field" via right-click, load the template, and test.
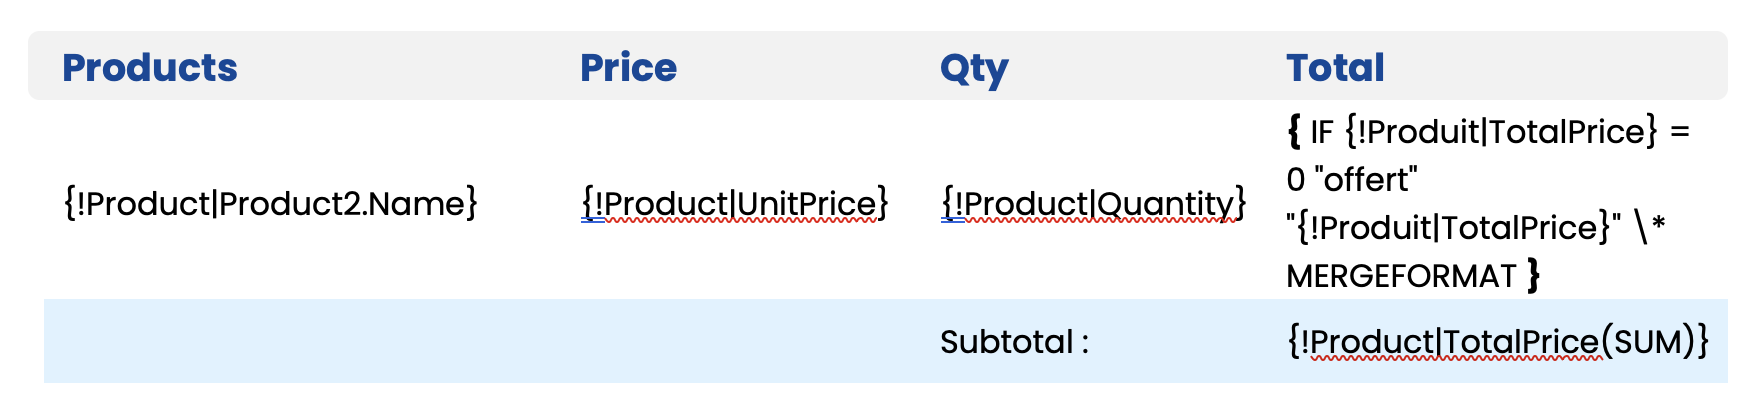
We assume that we have a template with an array where there is a currency field to be able to make the condition. In our example, we use opportunity and opportunity products.
- Make sure you have a main object as well as a child object configured
- Open the assistant from the document template
- Look for the field on your child object
- Click on the 3 small dots and add a condition
- Indicate “0" in the expected value
- Text if true = Free
- In the table in Word, position yourself where you want to insert the condition
- Finalize by uploading the template as usual
We're starting with an example where we want to display a checkbox in the same way as in Salesforce.
- Open the assistant from the document template.
- Find the field from your child object from which to launch the condition.
- "Text if the box is checked" = "✅"
- "Text if the box is not checked" = "❌"
- Confirm and copy the condition.
- From your document template, paste the condition via "Insert/Field" or "Quick Parts" > "Field," then confirm.
- Close the condition by right-clicking and selecting "Update Field," then load the template and test.
Note that if we use emojis here but we could easily insert images, you simply have to make this change after having inserted the condition, toggle the field codes with a right click on the condition.
Advanced display conditions
Create multiple nested conditions (or, and, and +or), and display images, tables, pyctograms, checkboxes, or display a specific layout with advanced SI condition constructs.
An OR condition (at least one condition true)
Trigger a condition if one of the two criteria is met
Ex: Display clause A if the opportunity status is at the Qualification or Proposal stage
The OR condition syntax works as follows:
{ IF { = IF "" = "Expected value" 1 0 } + { IF "{!Object|Field2}" = "Value2" 1 0 } > 0 "result if true" "result if false" MERGEFORMAT }1
Each sub-condition { = IF ... 1 0 } returns (true) or 0 (false)
With +: 0+0=0, as soon as one equals 1 → sum > 0 → true
An AND condition (both conditions true)
Trigger a condition if two criteria are met
Ex: Display a clause if the deal amount is greater than or equal to €50,000 and the probability is greater than 80%
The AND condition syntax works as follows:
{ IF { = IF "" = "Expected value" 1 0 } * { IF "{!Objec t|Field2}" = "Value2" 1 0 } > 0 "result if true" "result if false" MERGEFORMAT }1
Each sub-condition { = IF ... 1 0 } returns (true) or 0 (false)
With *: only 1×1=1 → product > 0 → true (otherwise it is always 0)
An AND + OR condition
Trigger a condition based on one or more criteria
Ex: Display a clause if the status is Closed Won or Closed Lost and the Country is France or Spain
To add a 3rd AND + OR condition, use the same logic: ... } + { IF "{!Object|Field3}" = "Value3" 1 0 } > 0 ...
Exemple de conditions populaires
A nested condition consists of replacing the result text with a new, complete condition.
The syntax works as follows: {!Object|Field1}
{ IF "" = "Expected value 1" "result if true 1" "{ IF "{!Object|Field2}" = Expected value 2
"" "result if true 2" "result if false" MERGEFORMAT } MERGEFORMAT }true
If → displays "result if true" directlyfalse
If → it evaluates the 2nd condition
Note
Each nested condition has its own MERGEFORMAT and curly brackets { }You can nest within the true result, the false result, or both.
There is no theoretical limit to the number of levels, but beyond 3-4, consider readability and maintenance.
Modèle d'exemple de condition
Find the advanced conditions template to download pre-made conditions that you can customize.
Are you having a problem with IF conditions?
Check out our help page: The Word IF condition inserted in the document does not trigger