

.svg.png)


Custom format management
The characters included in the Date format string are interpreted as a custom format and time string. Add a standard specifier to define how the desired information is displayed.
Pré-requis
✓ Avoir installé, paramétré Gonexa Doc et savoir créer un modèle de document
✓ Ajouter une balise à l'aide de l'assistant
Format date & numbers
The date format can be important to make the document easier to read.
📅 Customize the date format
Depuis votre balise basée sur une Date, ajoutez le spécificateur de format en fonction du résultat attendu.
FORMAT SPECIFIER
DESCRIPTION
example
{! Tag | API name(d)}
Short date
01/09/2023
{! Tag | API name(D)}
Long date
Monday September 10, 2023
{! Tag | API name(f)}
Long date+short hour
Monday September 10, 2023 13:30
{! Tag | API name(F)}
Long date+long hour
Monday September 10, 2023 13:30:50
{! Tag | API name(g)}
Short date+short time
10/09/2023 13:30:50
{! Tag | API name(G)}
Short date+short time
10/09/2023 13:30
{! Tag | API name(M)}
Month+day
September 10
{! Tag | API name(R)}
RFC1123
Monday, September 10, 2023 13:30:03
{! Tag | API name(T)}
Long hour
13:30:50
{! Tag | API name(t)}
Short hour
13:30
{! Tag | API name(Y)}
Date+month
September 2023
{!Label|APIName(dd MM yyyy)}
You can create complex tags with the following format specifiers in the form {!Object|Field(dd MMMM yyyy)} for example. You can also choose to use hyphens or “/” between each date format.
01 09 2023
{!Label|APIName(d)}
Day of the month, from 1 to 31
1
{!Label|APIName(dddd)}
Full name of the day of the week
lundi
{!Label|APIName(yyyy)}
4-digit year
2023
Pour exemple
Pour afficher le jour et le mois de la date d'expiration d'un devis seulement, on ajoutera l'extension (M) {!Quote|DeliveryDate} affichera "Livraison prévue le 10/08/2027"
{!Quote|DeliveryDate(M)} affichera "Livraison prévue le 10 août"
🔢 Customize the number format
FORMAT SPECIFIER
FIELD TYPE
example
{! Tag | API name(C4)}
MOTTO
123,45€
{! Tag | API name(D)}
Optional: precision specifier
{! Tag | API name(D6)}
DECIMAL
1234
-001234
{! Tag | API name(F)}
Optional: precision specifier
{! Tag | API name(F4)}
FIXED POINT
1234.56
1234,5600
{! Tag | API name(P)}
Optional: precision specifier
{! Tag | API name(P4)}
PERCENTAGE
100.00%
-39.7%
{! Tag | API name(N)}
Optional: desired number of decimals
{! Tag | API name(N3)}
NUMBER
1.234567
1,234
For more information, see the following article: article suivant : https://learn.microsoft.com/fr-fr/dotnet/standard/base-types/standard-date-and-time-format-strings
Do calculations
Make a product subtotal or simply count the number of products
Attention
L'utilisation des extensions nécessite d'être sur une version du package ultérieur à la version 1.7. Veuillez mettre à jour le package via l'AppExchange, le cas échéant
Use tag extensions in a table
Add up the amounts of the same child object, a group or even hidden information and combine multi-currencies. This way, avoid formula-type fields in Salesforce and easily display subtotals.
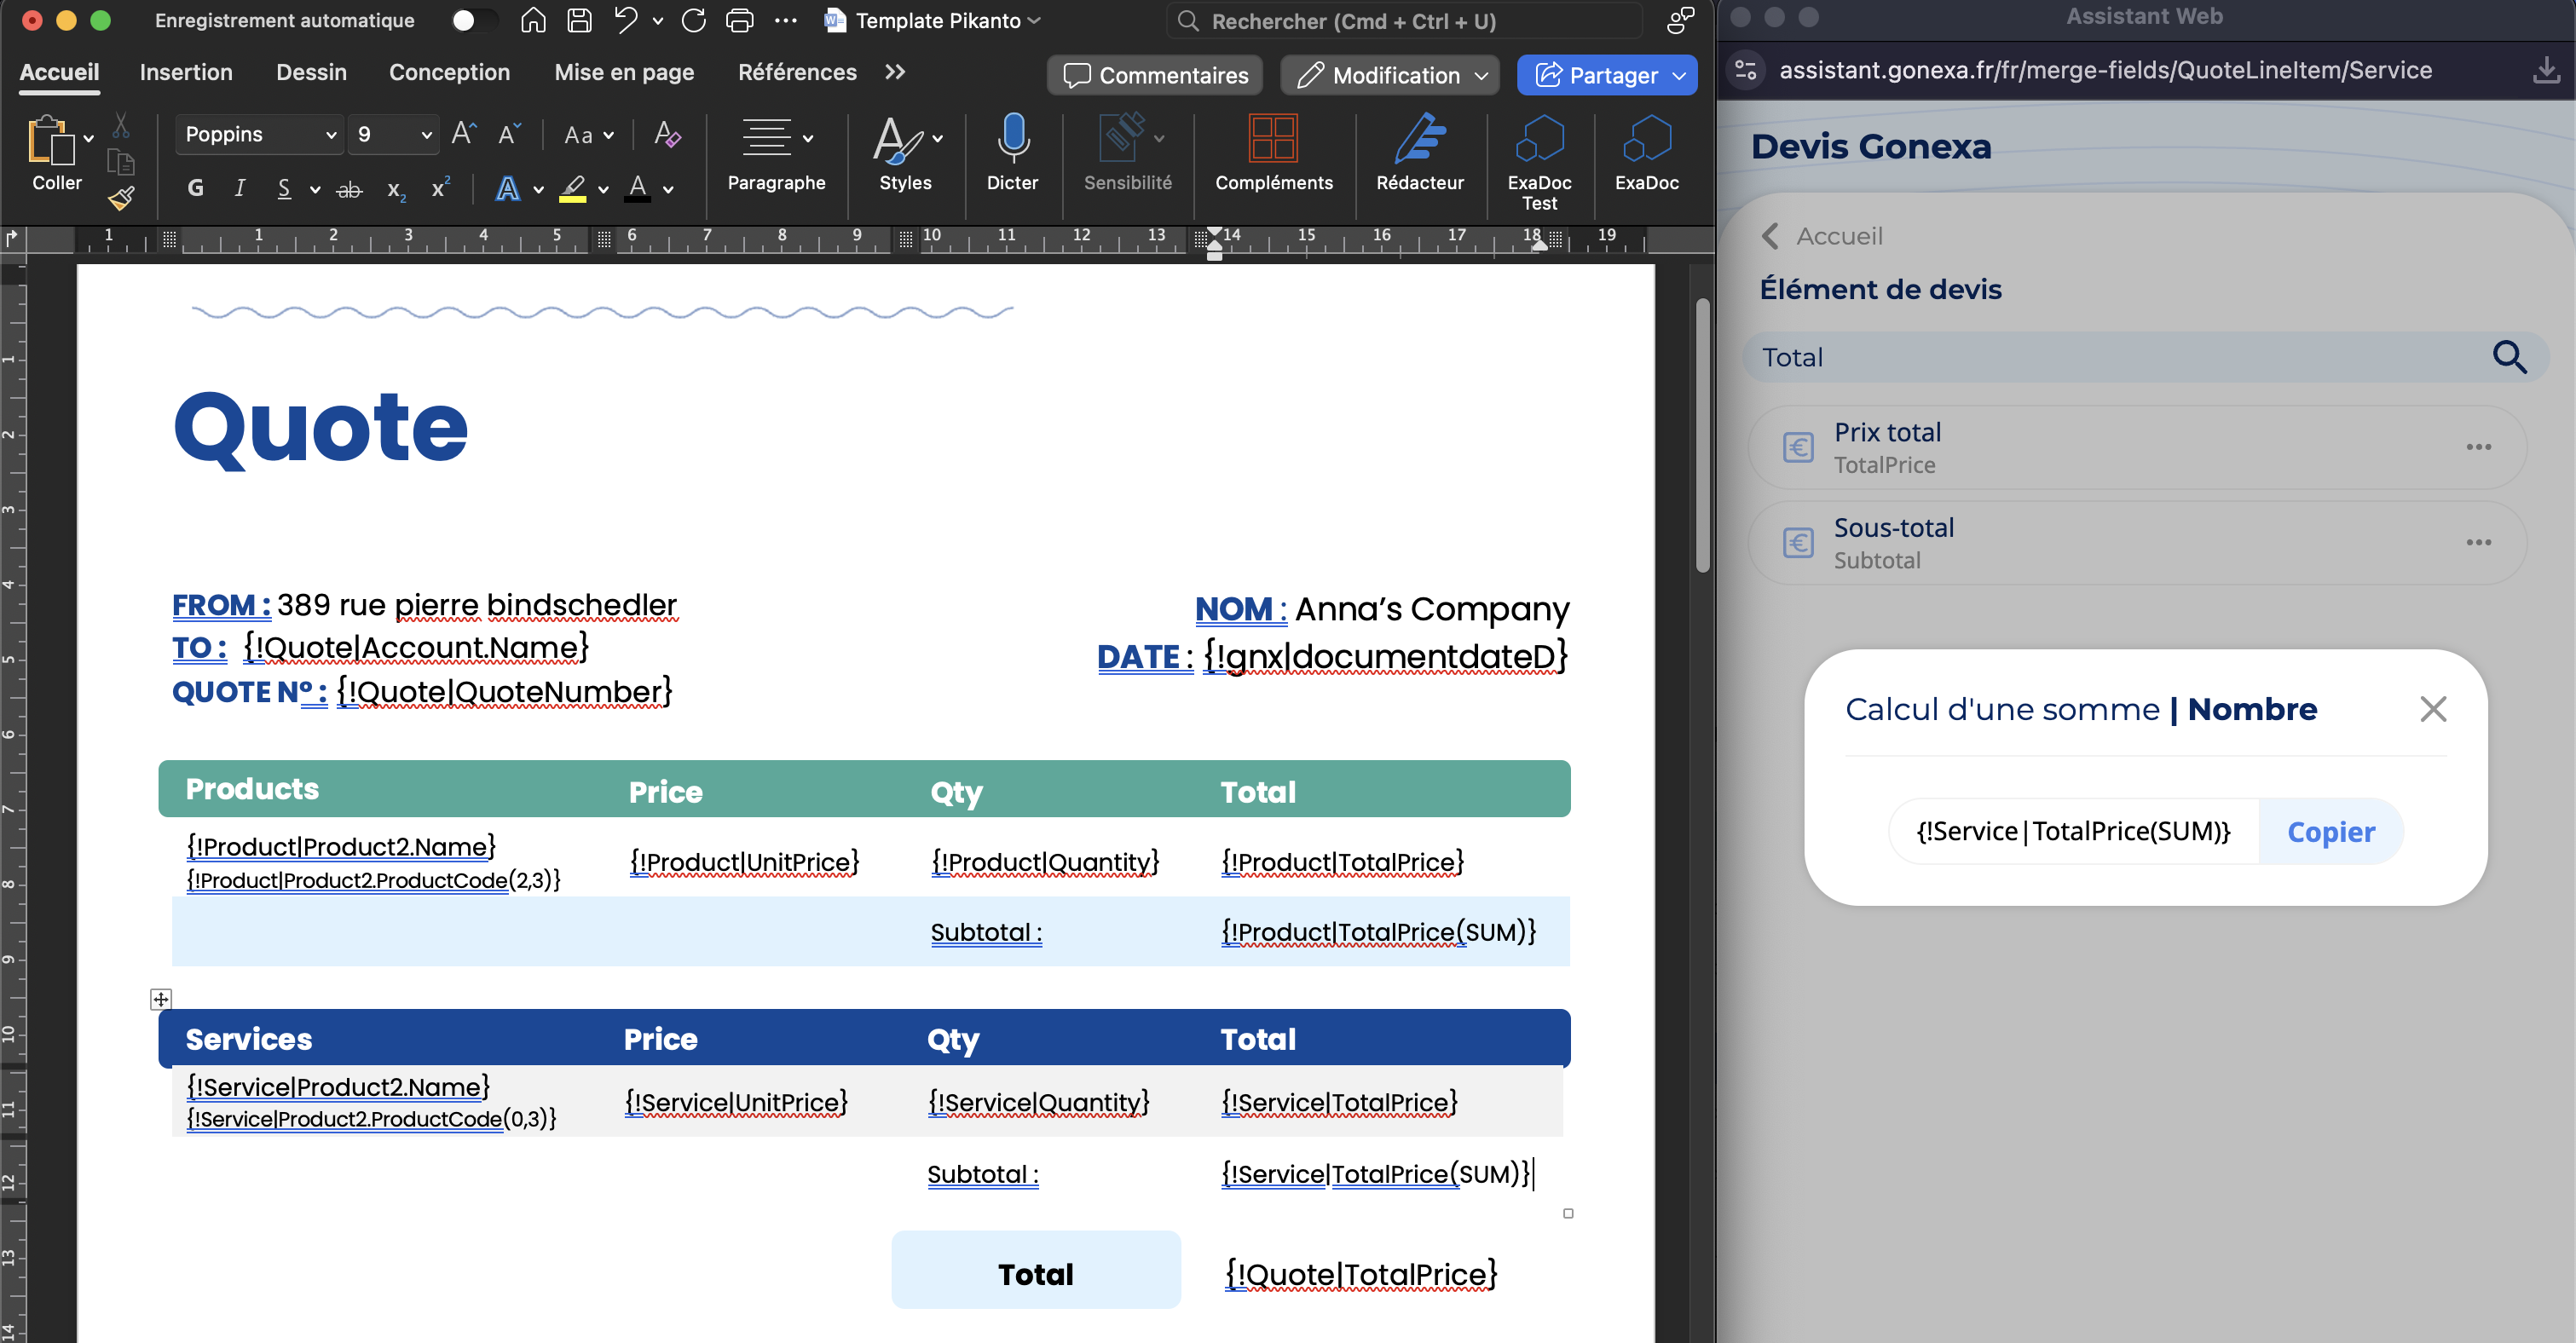
- After setting up a child object in Salesforce, opening the wizard, and placing your tag in your document template, add the extension (SUM) in your tag to add up the currencies or quantities: Ex. {! Product|Amount (SUM)}
- Place the new tag where you want on your page using one of two options.
- Copiez la balise proposée qui comporte l'extension de balise (SUM)
- Collez-là dans le tableau lié à l'objet enfant

Pour exemple
Ajouter le Sous total des Produits et le sous total des Services avec une balise dans chaque tableau {!Product|TotalPrice(SUM)}, {!Service|TotalPrice(SUM)}
Attention
Une balise SUM est impérativement une balise sur un objet enfant
La gestion des mutli devises est prise en compte.
Cumulate the records of the child object to show the number of rows in a table or that meet a criterion entered in Salesforce.
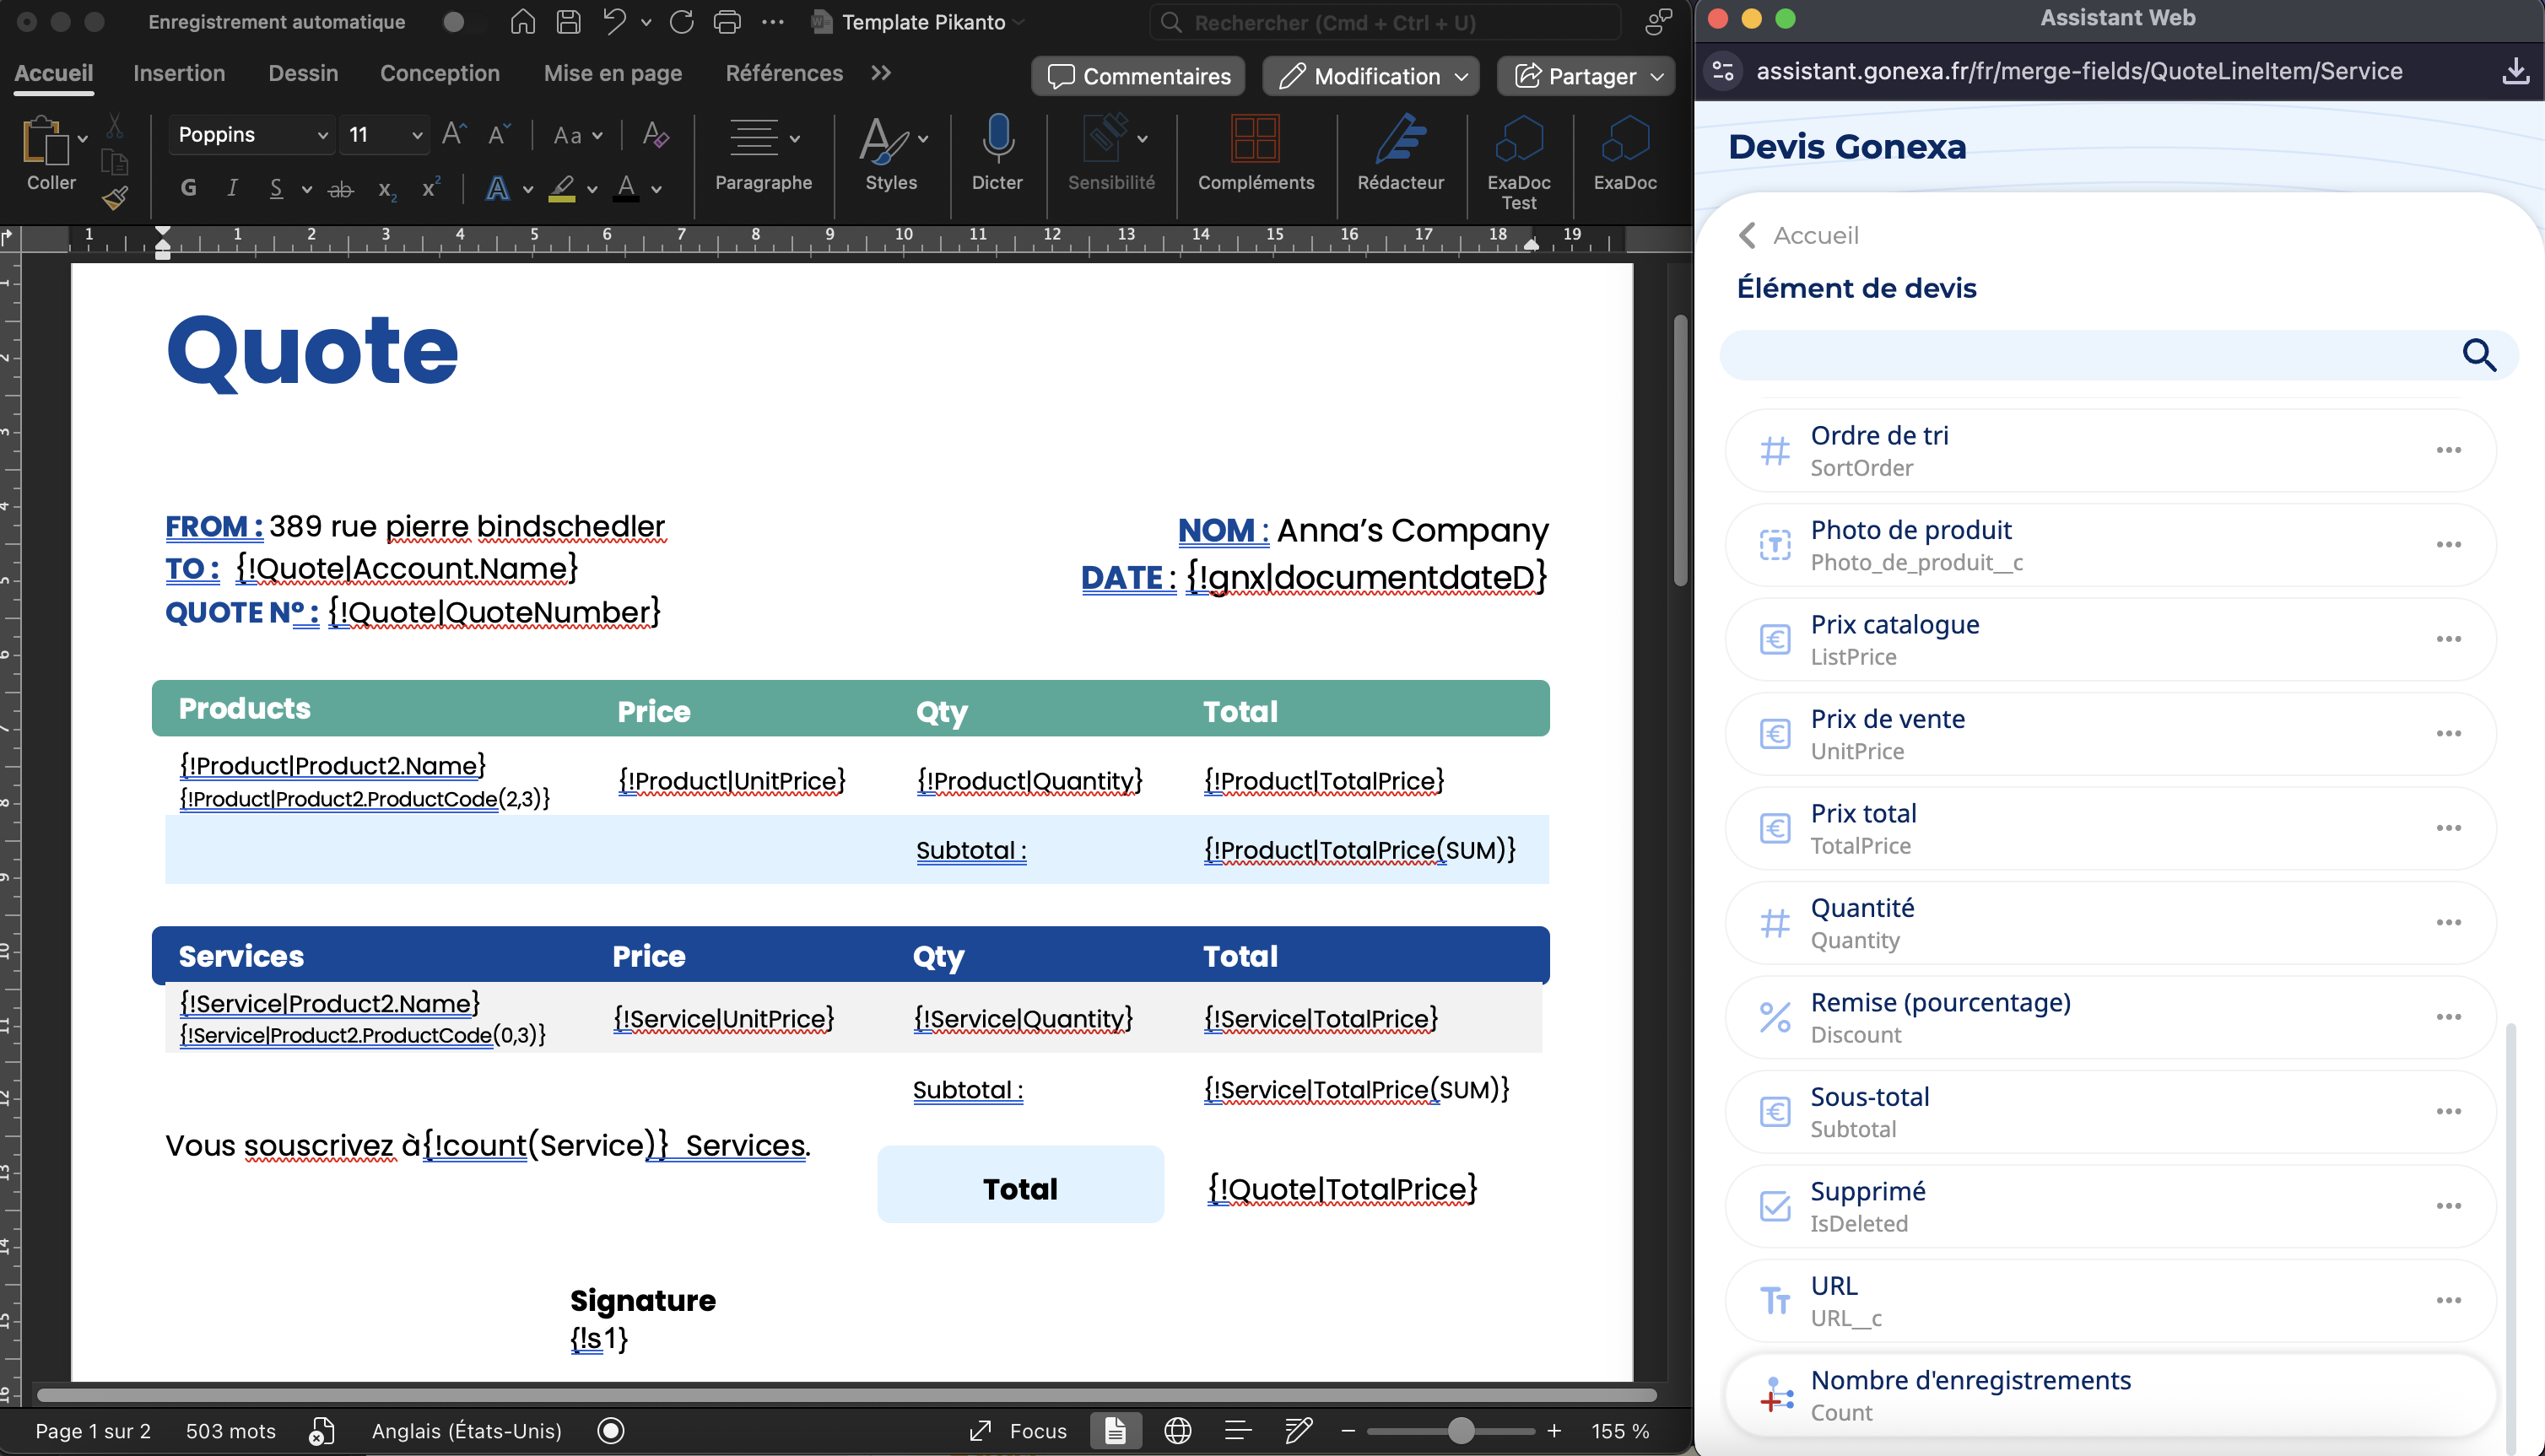
- After setting up a child object in Salesforce, open the wizard.
- Access the tags for the desired child object.
- Scroll to the bottom of the list of available tags and access the “Number of records” tag
- Click on it to copy it and paste it where you want it to be on your page.
Attention
Il est possible d’afficher une balise COUNT dans un tableau ou en dehors d'un tableau
Une balise COUNT est impérativement une balise sur un objet enfant
Pour exemple
Sera utile pour compter le nombre de participants à une formation avec la balise "{!count(Participants)} élèves ont participés à cette formation"
Manage “Rich Text” fields
By default, the Salesforce layout is applied to the content of a rich text field placed in a Word document at generation. Add one or more tag extensions to change these settings.
To apply the format applied to the tag in the Word template instead of the format used in the Salesforce field, you will need to use a tag extension to allow you to choose exactly the right format.
Les formats modifiables
"f" pour "font" = police
"s" pour "size" = taille
"c" pour color = couleur
"t" pour "type form" = forme de caractère,
"i" pour "indentation" = indentation
- From the wizard, access the Rich Text tag you want to edit
- Click on the 3 small dots on the right
- Click on “Format Richtext”
- Select the format to take from Word
- Your tag is copied and can be pasted into your template with the following format: Ex: {! Account|Description (HTML,
Attention
Dans le cas où la gestion des indentations n'est pas bien prise en charge, utilisez l'extension i pour uniformiser l'affichage avec une balise comme {!Account|Description(HTML,i)}
Pour exemple
{!Account|Description(HTML,f,s)} dans le cas où vous souhaitez appliquer la police et la taille de la balise Word définie dans le modèle. Le résultat sera uniforme à la mise en page Word.
Manage images
Make sure to display the image exactly the way you want it
It is possible to display dynamic images when generating a document. Images can be stored directly in fields such as rich text boxes or URLs.
However, we recommend storing the image as a Salesforce file and then storing the Content Version ID on the record
- In your document template, open the wizard to access the desired object
- Find the rich text box or URL field that contains the image, or the text field that contains the content version ID
- Click on the 3 small dots “...” then on Configure image
- Copy and paste the tag into your document
Pour exemple
On utilisera {!Account|Champtexte__c(img)} dans le cas où vous conservez la taille d’origine
{!Account|Champtexte__c(img,w=30,h=15)} dans le cas où vous définissez une taille personnalisée, avec une largeur de 30 et une hauteur de 15
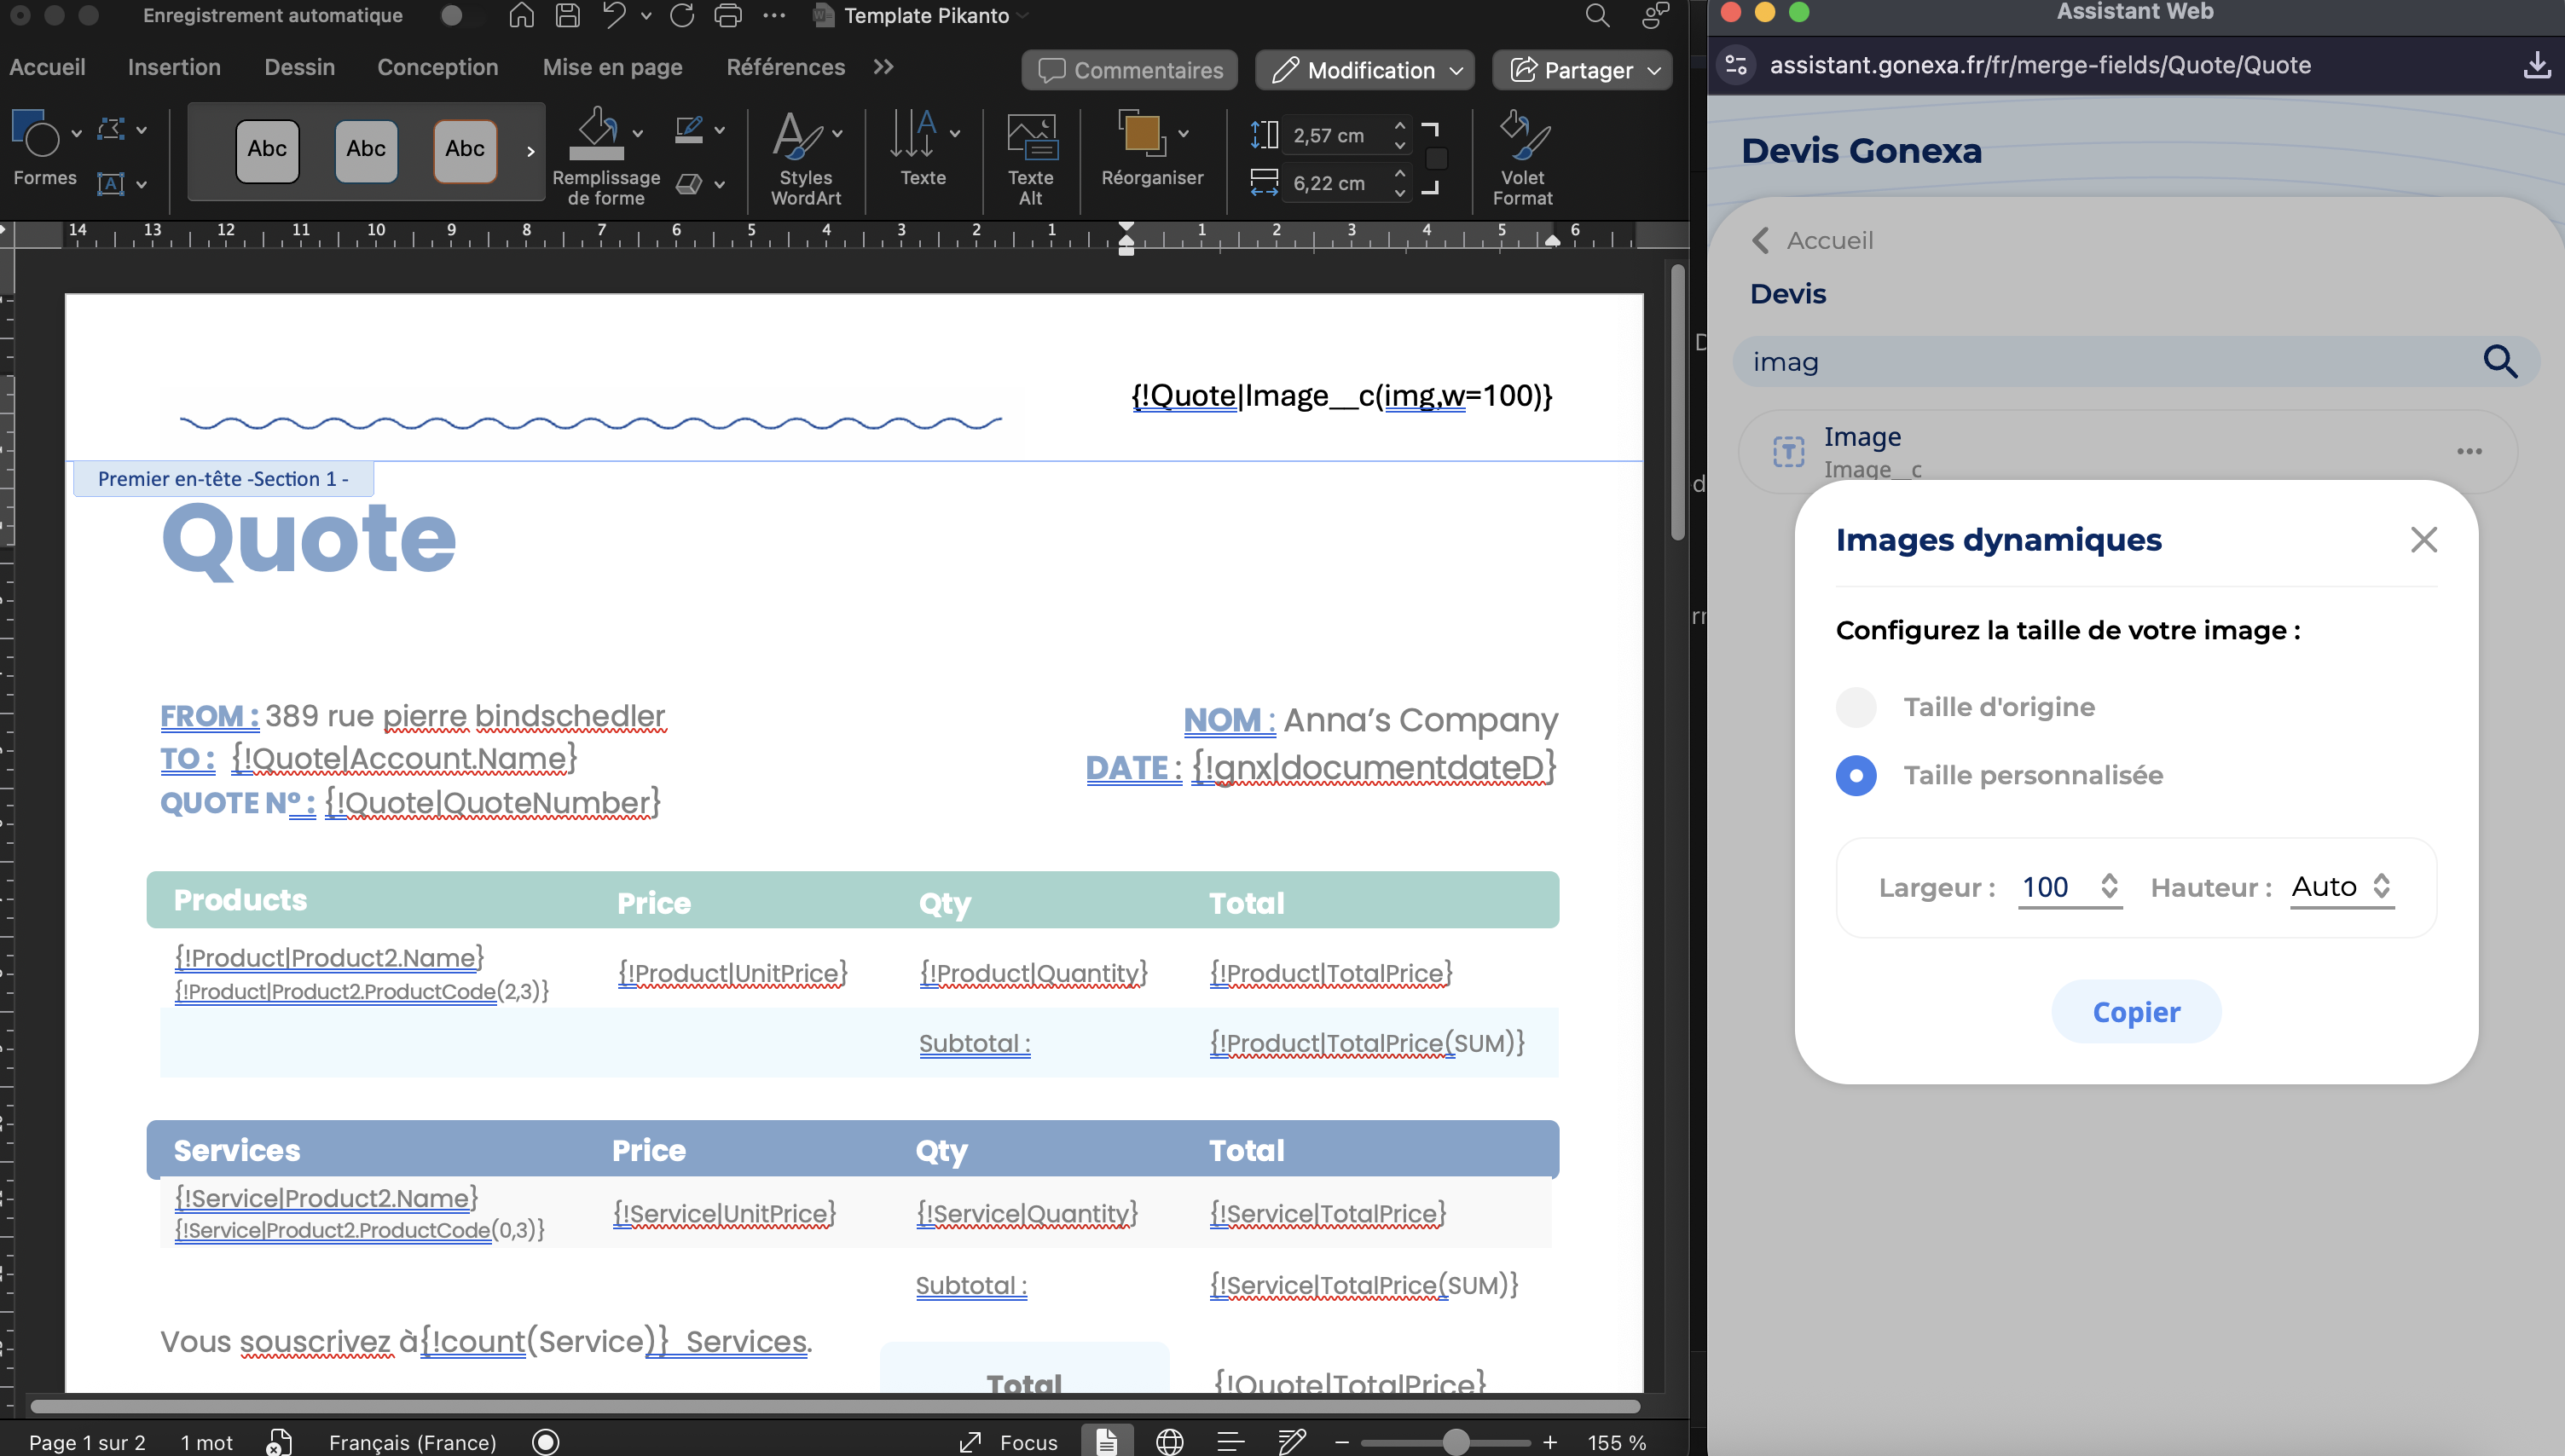
{!Account|Champtexte__c(img,w=100)} dans le cas où la largeur est de 100 pixel et que la hauteur se resize automatiquement pour ne pas déformer l'image - The tag then contains the img tag extension indicating that it is an image
Astuce
Ne définissez qu'un paramètre parmi largeur / hauteur et laissez l'autre en Auto. À la génération, le paramétre non définit s'ajustera automatiquement pour ne pas être déformé.
Partial display of a text field
Choose the number of characters in a field
The “Partial Display” feature will be very useful for truncating a text field.
Comment ça fonctionne ?
La syntaxe {!label|champ(X,Y)} permet d'extraire une sous-chaîne d'un champ texte.
Paramètres :
X = position de départ (en partant de 0)
Y = nombre de caractères à afficher
La fonctionnalité "Afficher partiellement le texte" dans l'Assistant Gonexa génère automatiquement cette syntaxe sans avoir à l'écrire manuellement..
- If you want to show only a part of the field whose value returns 5A123 on the document, to show 5A on the one hand and to show 123 on the other hand, in another place on the document.
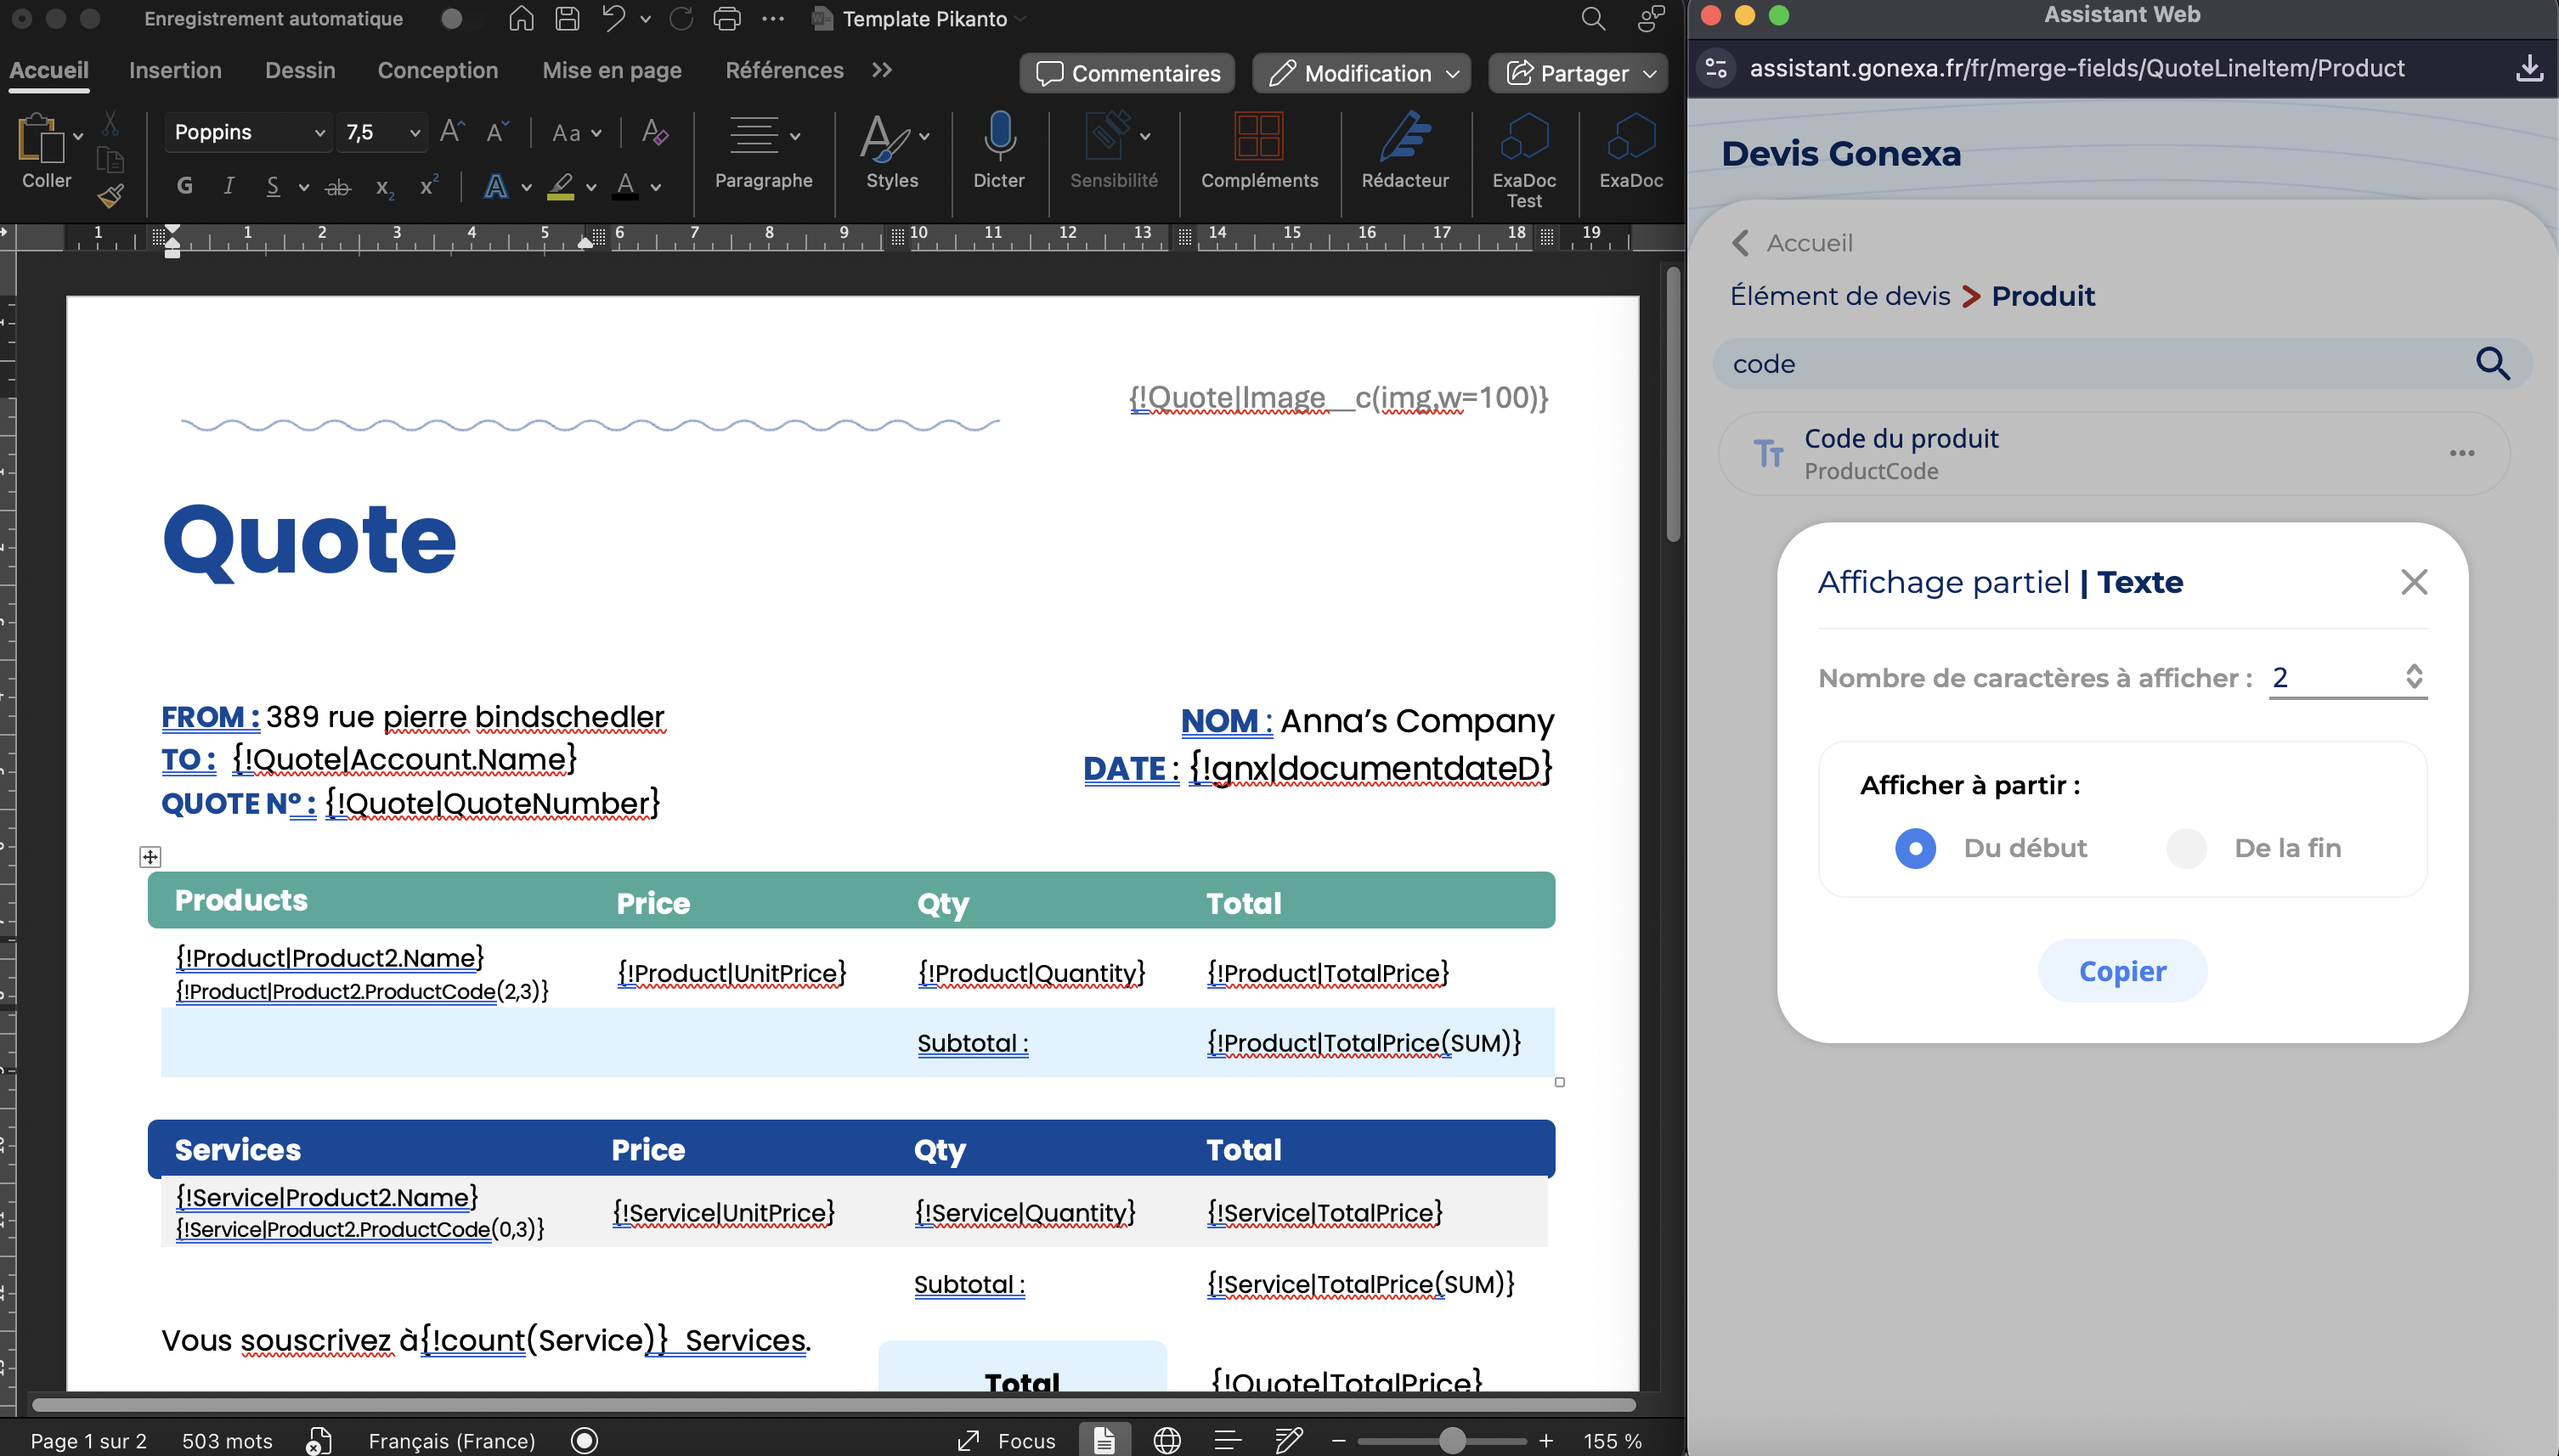
- In this case, we will have to add to the first tag (0.2), the zero meaning that we are starting from the left and the two that we are taking the first two numbers. And (2, 3) to the second tag, to indicate that we want to take the last 3 digits from the 2nd character.
- Définissez le nombre de caractères à afficher et dans "Afficher à partir" cochez "du début" ou "de la fin"
- Copiez-collez ensuite la balise dans votre document à l'endroit souhaité
Pour exemple
Un champ de code produit qui contient 5A133.
{!obj|champ(0,2)} = pour renvoyer 5A et la balise {!obj|champ(2,3)} pour renvoyer 123
Attention
Cette fonctionnalité est limitée aux champs de texte ne contenant que des lettres ou des chiffres, et dont le nombre total de caractères est connu
Inserting URLs into text
Turn text into a clickable link in Word
Attention
L'utilisation de ces extensions nécessite d'être sur une version du package ultérieure à la version 2.3.
Veuillez mettre à jour le package via l'AppExchange ou votre compte App, le cas échéant.
In Word, it is possible to associate a hyperlink to specific text using a tag extension. This makes it possible to display personalized text, while redirecting the user to a web address.
Comment ça fonctionne ?
La syntaxe {!label|champ(link,Texte_affiché,Message_erreur)} transforme une URL stockée dans un champ en lien hypertexte cliquable dans le document Word.
3 paramètres :
link : mot-clé fixe, toujours identique
Texte_affiché : ce que voit l'utilisateur (ex: "Cliquez ici")
Message_erreur : texte affiché si l'URL est invalide ou vide
- Construisez votre balise via l'assistant et enrichissez son extension selon la méthode ci-dessus
- Insérez-là dans votre document Word à l'endroit souhaité
- Enregistrez, chargez et testez comme d'habitude
Pour exemple
Pour insérer un lien cliquable lié à un champ texte contenant une URL et affichant le texte "Cliquez ici" avec un message d’erreur "Une erreur est survenue", la balise complète sera :
{!Account|Champtexte__c(link,Cliquez ici,Une erreur est survenue)}
Attention
Assurez-vous que l’URL du champ est valide pour éviter l’affichage du message d’erreur
Uppercase and lowercase
Choose whether to uppercase or lowercase the value of a field
Attention
L'utilisation de ces extensions nécessite d'être sur une version du package ultérieure à la version 2.4.
Veuillez mettre à jour le package via l'AppExchange ou votre compte App, le cas échéant.
It is possible to transform field values into uppercase or lowercase letters when generating a document. This feature provides more flexibility and facilitates the consistent formatting of the displayed data.
Ces extensions vous permettent de gérer la mise en forme directement dans le document généré, et vous évite ainsi de créer des champs supplémentaires dans Salesforce.
Comment ça fonctionne ?
Deux extensions pour forcer la casse à la génération du document :(UPPerCase) → tout en majuscules
(lowerCase) → tout en minuscule
- Construisez votre balise via l'assistant et enrichissez son extension selon la méthode ci-dessus
- Insérez-là dans votre document Word à l'endroit souhaité
- Enregistrez, chargez et testez comme d'habitude
Pour exemple
UPPERCASE → tout en majuscules {!Account|Name(UPPerCase)} devient
Anna's CompanyANNA'S COMPANYlowercase → tout en minuscules
{!Account|Description(lowerCase)} devient
Logiciel CRM Entrepriselogiciel crm entreprise