

Create a template
Set up your first template using an example using Word or Google Doc
We're going to go through 3 simple steps to achieve this:
- Creating the basic configuration in Salesforce
- Word document design
- Loading the model into Salesforce to make it available to users
Pré-requis
✓ Avoir fait l'installation complète du Package Gonexa
✓ Maîtriser les basics de Microsoft World ou Google Docs
✓ Avoir mis à jour son application sur une version récente
Basic Setup in Salesforce
- Click on the “Document template” tab
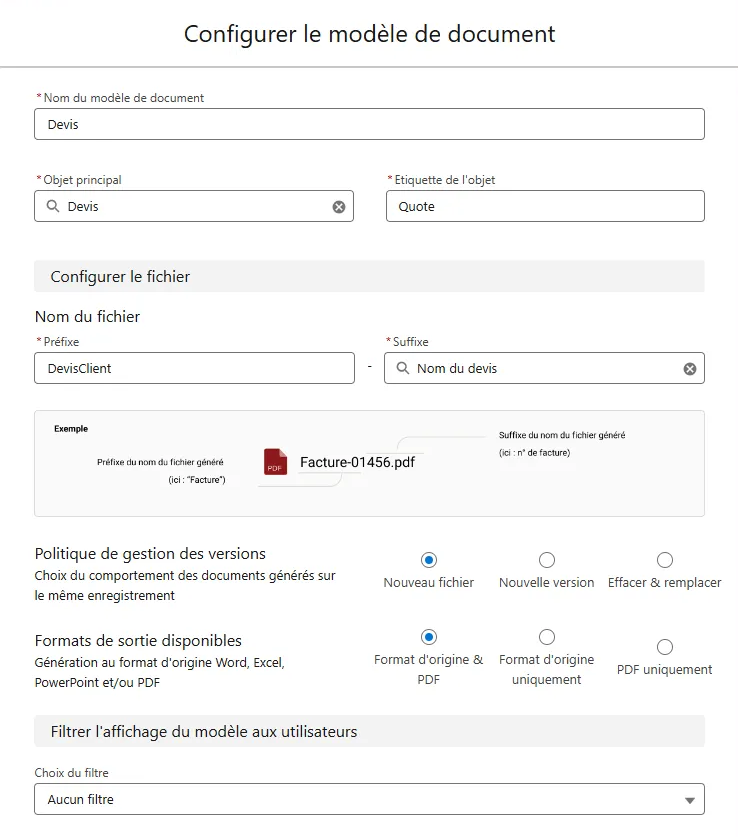
- Click on “New”, by default you create a “Main” template
- Give the model a name: It will appear to the user if several models are present on the same Salesforce object
Qu'est-ce que l'objet principal ?
C'est l'objet Salesforce depuis lequel vous souhaitez lancer la génération et le contexte de base pour créer un document et récupérer la données à afficher dans le modèle. Il peut être standard, custom ou d'un autre applicatif Salesforce.
- Choose the main object: the Salesforce object will be the starting point for the generation, it is the basic context for creating a document
- The tag label is automatically populated with the object's API name, but you can change it to make your document model easier to understand.
Pour exemple
Vous pouvez renommer l'étiquette Opportunité_Gonexa_2026__c par Opp pour faciliter la compréhension des balises qui seront insérées dans le modèle et réduire leur longueur.
Astuce
Pour avoir un nom de fichier plus personnalisé comme "Devis-{Date du jour} {N° De Devis} Nom du compte" pensez à créer un champ formule sur l'objet principal et à le définir comme suffixe.
- Ecrivez le préfixe que vous voulez donner au nom des documents à générer. C'est un texte figé qui composera la première partie du nom du fichier.
- Define the suffix, choose a field on the main object that will make up the 2nd part of the file name dynamically. Tip, you can create a formula field on the main object to have a more personalized file name
- : each generation on a recording, the previous file is deleted and replaced
LES DIFFÉRENTES POLITIQUES DE GESTION DES VERSIONS
À chaque nouvelle génération sur le même enregistrement, un nouveau fichier sera créé.
Permet de garder tout l'historique.
À chaque nouvelle génération sur le même enregistrement, une nouvelle version du même fichier sera créé.
A favoriser si vous souhaitez garder une traçabilité mais n'avoir qu'un seul fichier.
À chaque nouvelle génération sur le même enregistrement, le nouveau fichier écrasera l'ancien pour le remplacer.
Utile pour optimiser le stockage et n'avoir toujours qu'un fichier.
- Sélectionnez les formats de sortie disponible à appliquer parmi les options.
LES FORMATS DISPONIBLES
Offrira à l'utilisateur la possibilité de choisir de générer son document dans le format d'origine comme Word, Powerpoint, Excel ou en PDF.
L'utilisateur pourra générer son document uniquement dans le format d'origine c'est à dire en Word, Powerpoint, Excel ou en PDF.
L'utilisateur ne pourra générer le document qu'en format PDF, sans pouvoir le modifier. [Le plus utilisé]
- Sélectionnez le type de génération à appliquer parmi les options.
LES DIFFÉRENTS TYPES DE GÉNÉRATION
Permet de générer un document de manière immédiate et d'être redirigé sur le document une fois généré [Le plus utilisé]
Permet de générer le document de manière asynchrone. Cela signifie que l’action s’exécutera en arrière plan. Dans le cas d’une génération future, vous ne serez pas redirigé sur le document et il sera nécessaire d’actualiser la page pour voir le document
Permet de générer un document très lourd et complexe sur les serveurs Gonexa. Dans ce cas vous ne serez pas redirigé sur le document et il sera nécessaire d’actualiser la page après quelques secondes pour voir le document. [Necessite une licence spécifique]
- Save
Les paramétres de bases ont été définis. Vous pouvez directement construire par la création du modèle. Si toutefois, vous souhaitez ajouter des balises sur des objets enfants, créez-les d'abord avant de passer à la partie design et insertion de balises.
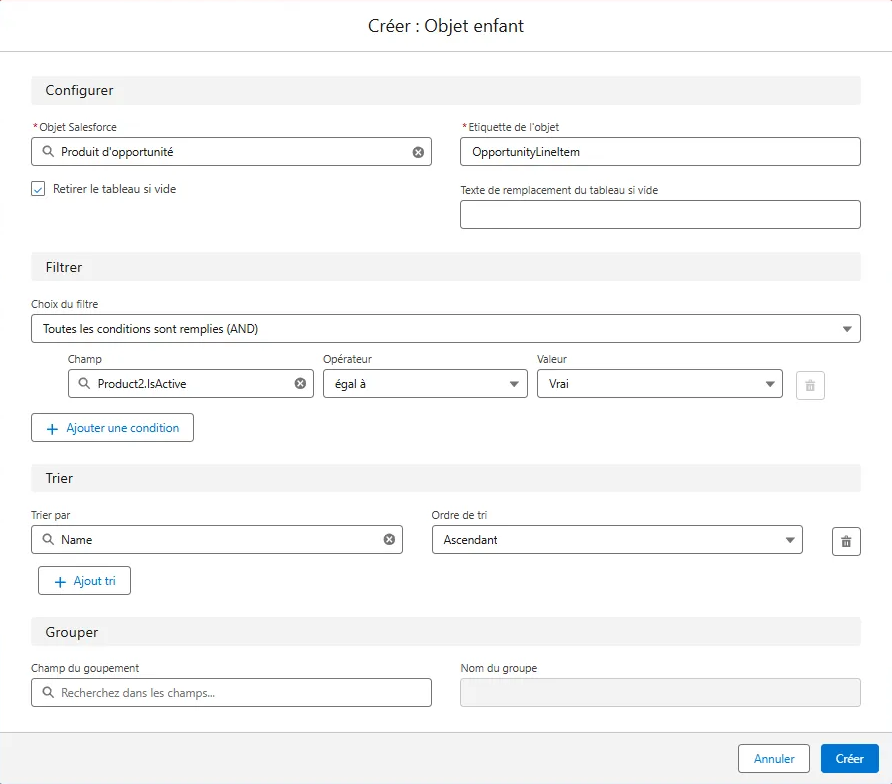
Qu'est ce qu'un objet enfant ?
Facultatif, l'ajout d'un ou plusieurs objet enfant permet d'afficher une liste associée à l'objet principal pour lister plusieurs éléments comme les produits d'opportunités, les produits ou les contacts d'un compte sous forme de tableau.
- Go to the “Gonexa Assistant” component to access the creation of child objects
- Click on “+ Child object”
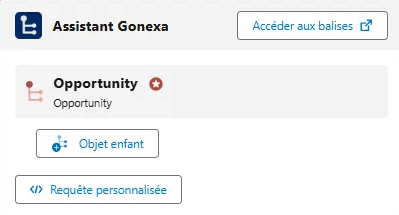
- Choose the relevant Salesforce object
- By default, the label is fed with the object's API name, but you can change it for greater clarity in the model
- Add a filter if you want to filter the child records to be retrieved
- Ajoutez un tri si vous souhaitez en appliquer un pour les résultats dans le tableau enfant
- Finalisez cette partie en cliquant sur "Créer"
For more details on children's objects, go to the article Manage tables
Design in Word
Astuce
Vous pouvez partir d'un modèle de document que vous avez déjà ou directement télécharger un modèle Gonexa parmi la librairie de modèles pré-conçus : Templates préconçus
- Make sure to layout your document completely on the part that will not change at the time of generation
- Simply provide tables in your word for everything that will concern “Child Objects” (ex: Opportunity Products)
- In the template document, click on “Access Tags” in the Gonexa Assistant component
- Allow the assistant to communicate with your Salesforce (to be done only once)
Astuce
Positionnez l'assistant sur un angle de votre écran, a côté de votre modèle Word pour l'avoir à portée de main.
- Click on the object in the Assistant to display the available fields
- Use the search bar to filter
Vous pouvez également cliquez sur les flèches pour naviguer entre les relations des objets et chercher des informations liées à l'objet principal pour remonter les relations
- Click on the desired field (this field is copied to your clipboard)
- All that's left to do is paste to the desired location in your document
- Configure the formatting of the tag with the Word standard (size, color, alignment, bold...)
- Make sure to save your word template in a clean directory to find it easily
- For users of the Google Workspace suite with Google Doc, save your template in the format Word (.docx)
Attention
La taille d'un fichier est limitée par le standard de Salesforce à 3Mo.
Pensez à optimiser la taille de votre fichier pour pouvoir le charger et ainsi optimiser le temps de génération et le stockage de votre org.
Publish your template
Attention
Seuls les documents au format docx, xlsx, pdf ou pptx sont pris en charge.
- Go back to setting up the document template in Salesforce
- Click on “Add a template”
- Select on your word template from the file explorer
- Click on “Open”
- Wait a few seconds for the success message to appear
- In case of a red dot and incorrect tags, a Merge fields icon allowing you to check and verify the erroneous tags in order to correct them in your Word
La fonctionnalité d’Aperçu permet de valider la mise en page et les éléments dynamiques d’un modèle, grâce à un aperçu fidèle du document final, avant toute génération complète.
- In the Generation Test section, search for the name of a record in your main object to find a record
- Click on the action arrow then choose “Preview”
- The document opens in a new tab with the data of the selected record

Astuce
Les générations en Sandbox ne sont pas comptabilisées. Testez sans limite !
- Enter the name of a record of your main object to find a record
- Click on “Generate”
- A document is then generated and you are redirected directly
Votre modèle est à présent disponible à la génération pour toutes les personnes qui ont bien l'ensemble d'autorisation "Gonexa Doc Users permission sets".
Retournez sur votre objet principal pour voir le modèle disponible à la génération via le composant de génération.
- From the “Journals” tab, find the generations of your document template
- Access the Log of your choice, click on Record to access the generation record
- And click on Document to access the generated file
Dans le cas d'une erreur de log, aucun document n'est généré.
Your generated document appears in the standard Salesforce preview by default. You can overload it with the Gonexa preview.
Astuce
Le composant de Preview Gonexa offre un aperçu des PDF plus rapide et l'accès à diverses commandes comme l'impression rapide, le zoom ou le téléchargement du document en un clic.
- From the page of your generated file, click on edit the page
- From the custom components, drag and drop the Gonexa - File Preview action onto the page
- Save
Attention
Si lors de la génération du document, l'utilisateur ne peut pas voir le modèle généré, référez vous à la gestion des règles de partage du modèle de document. S'il est en privé l'accès au modèle peut être bloqué. Si aucune règle de partage n'a pas été créé, nous vous recommandons de passer le paramètre de partage du modèle à public lecture seule.
Filter template visibility
Rendez disponible la génération du document en fonction d’un critère basé sur votre objet principal.
- Go to the model configuration
- Go to the “Filter the display of the model to users” section
- Set the desired condition (s) and click on Validate
- Thus, only templates that meet the defined criteria will appear in the standard generation component
Pour exemple
Vous pouvez rendre disponible le modèle de contrat A uniquement pour les devis supérieur à un certain montant ou de définir un modèle B pour les grands comptes et un modèle C pour les fournisseurs.
Astuce
Vous pouvez ajouter autant de conditions que nécessaire et choisir si elles doivent être strictement vérifiées avec AND ou si l'une peut être vérifiée avec OR.