

.svg.png)


Create a PDF document template
Create a document template in PDF input format that aims to fill in information specific to the recipient.
We are going to go through 2 simple steps to achieve this:
- The creation of a fixed fund
- The creation of the form
Pré-requis
✓ Avoir une licence Adobe Acrobat
Create a fixed background
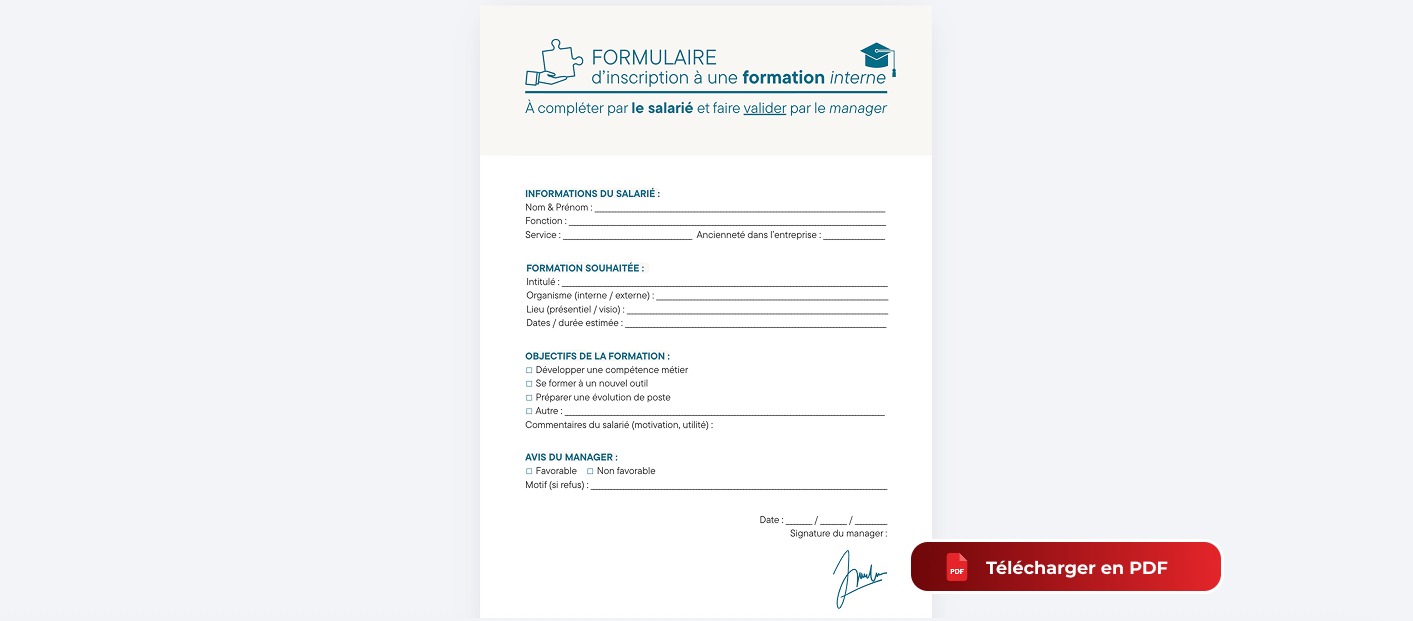
Create the background of a form with the method of your choice (Canva, Google Docs, Word, Figma, or directly with PDF).
- Leave spaces dedicated to tags
- Donnez les titres et les indications clés du formulaire
- Give titles and indications
- Convert it to PDF.
Astuce
Vous pouvez aussi télécharger des modèles pré-conçus sur une plateforme dédiées comme Canva ou utiliser un modèle Gonexa parmi la librairie de modèles pré-conçus : Templates préconçus
Create the form from Adobe Acrobat
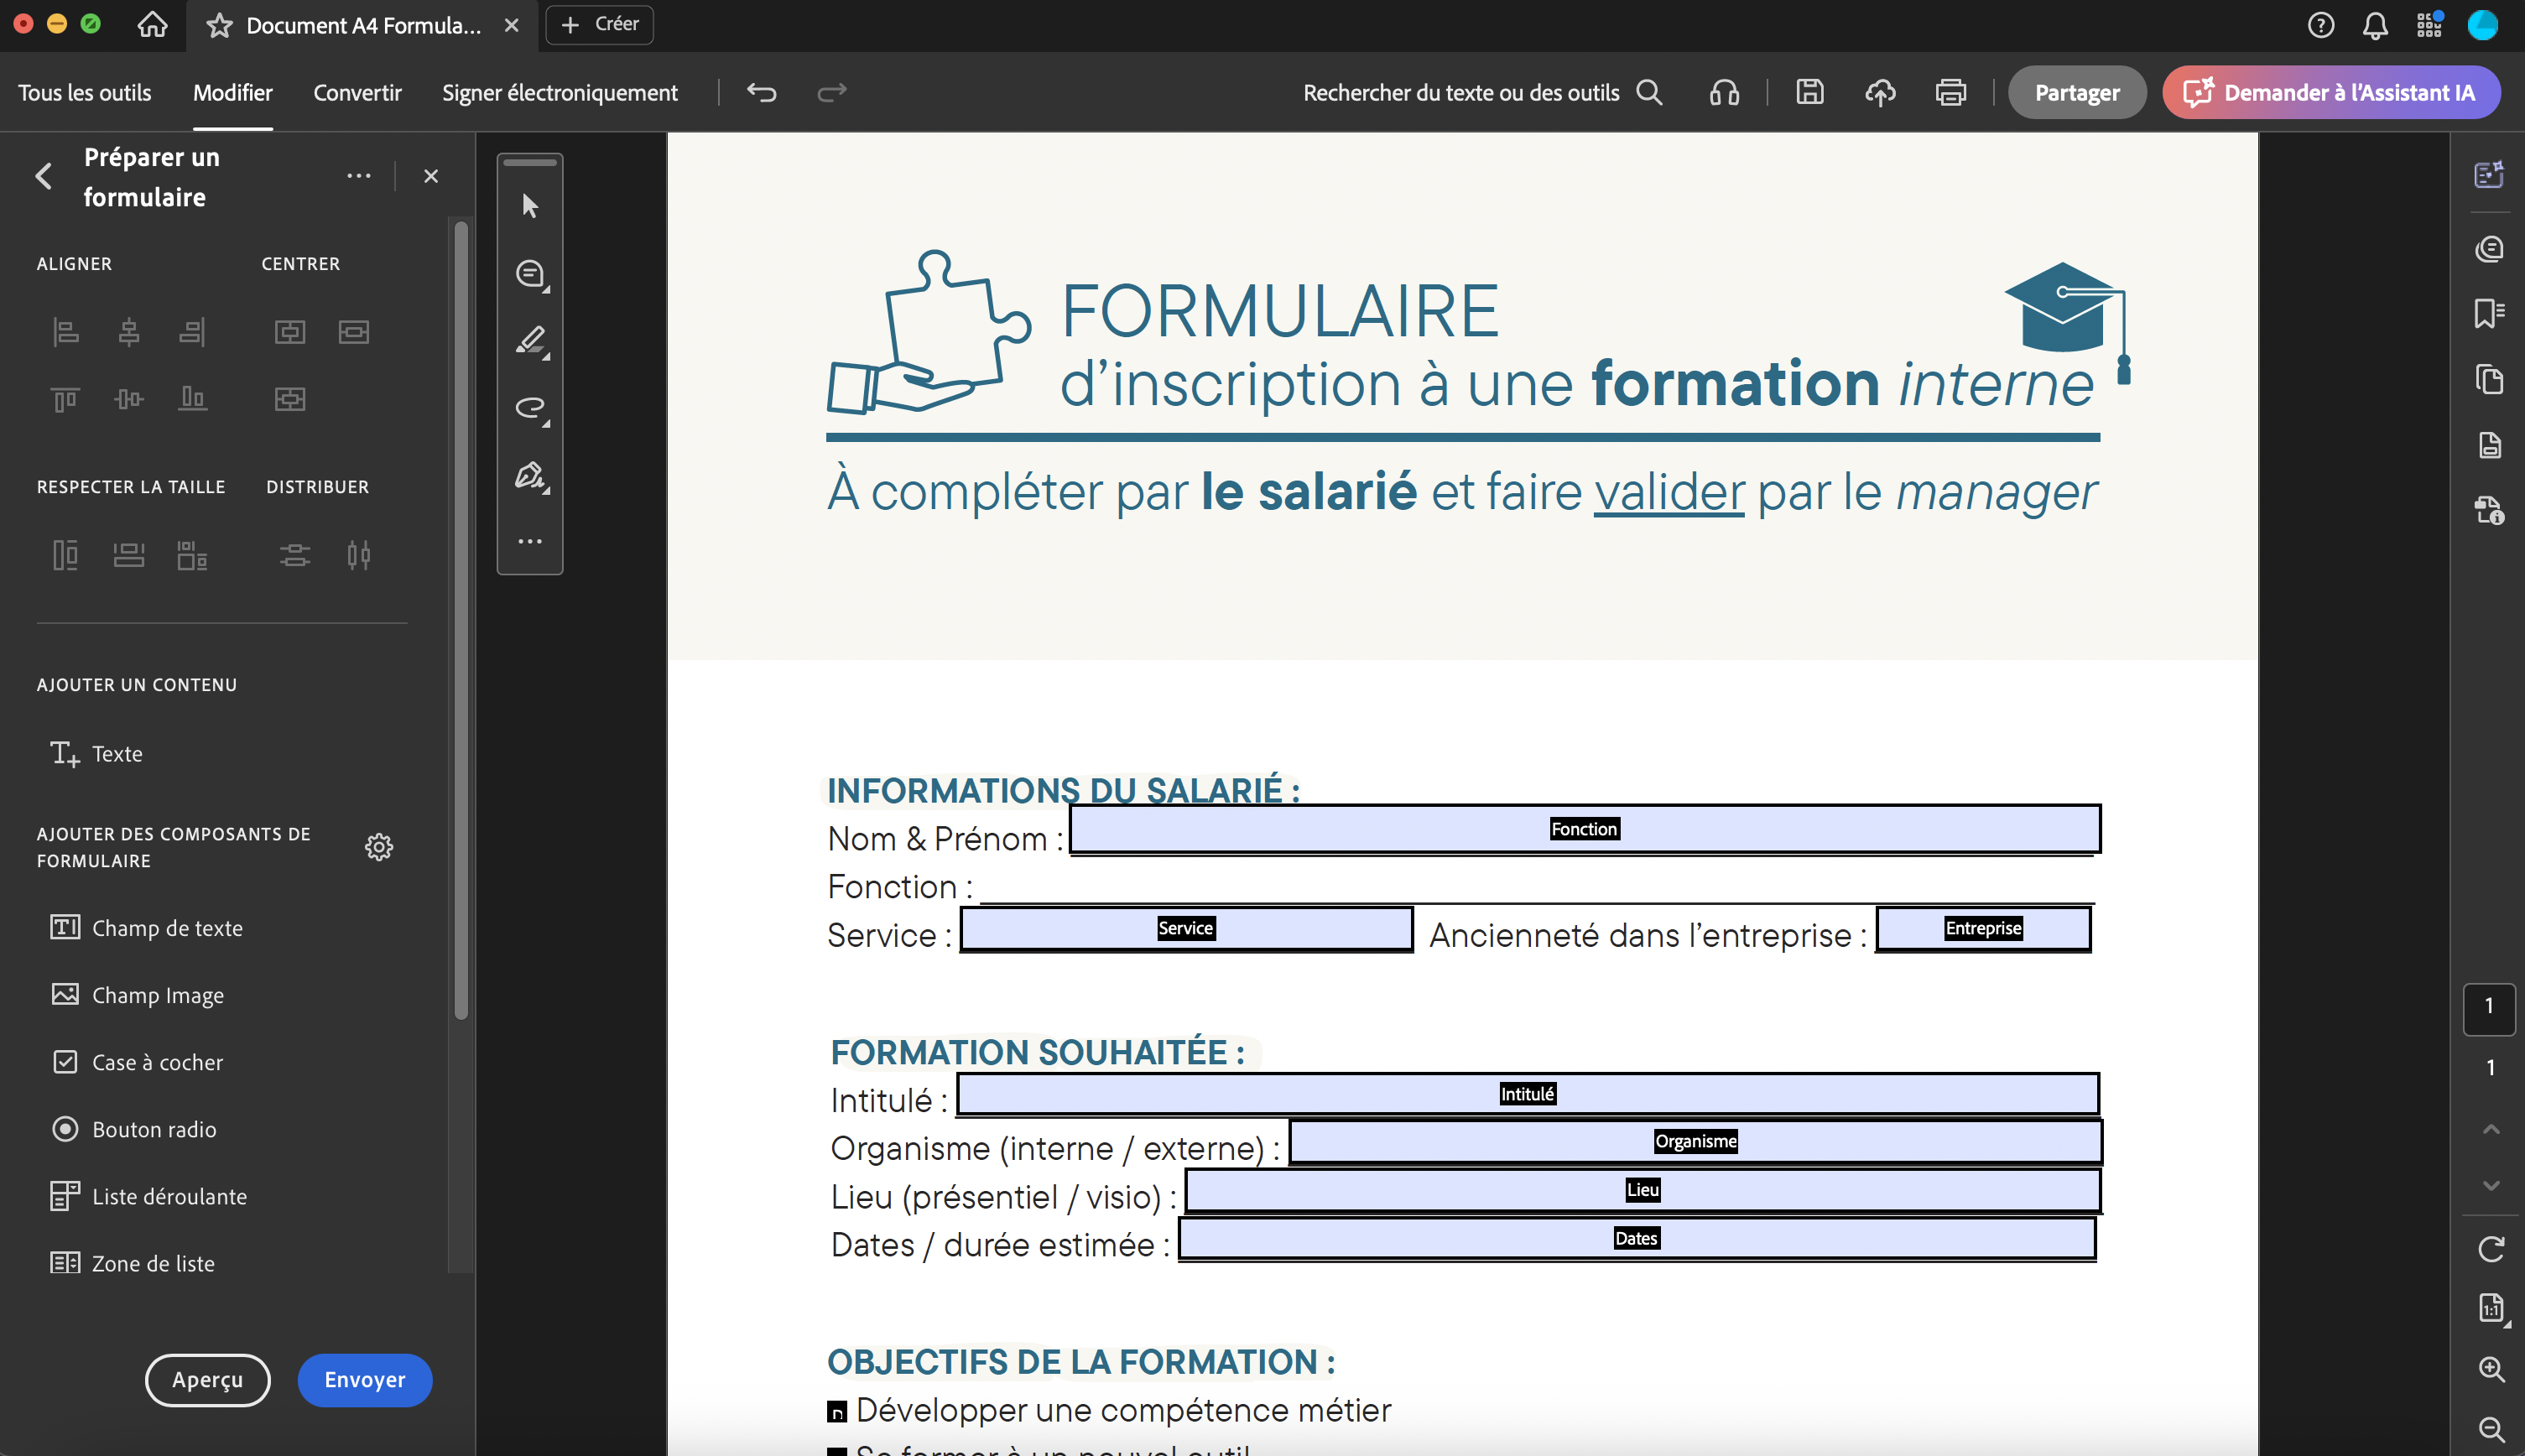
Open your PDF template (fixed background) with Adobe Acrobat to add tags. Access the available tools from the banner, select “Prepare the form” and click on “Start.”Adobe Acrobat pour y ajouter des balises. Accédez aux outils disponibles depuis le bandeau, sélectionnez "Préparer le formulaire" et cliquez sur "Démarrer."
- Depuis le bandeau accédez à tous les outils disponibles par Adobe Acrobat
- Cliquez sur "Préparer un formulaire" et sur "Créer le formulaire" pour commencer la création du formulaire.

- Vous trouverez des contenu déjà pré-ajoutés. Créez de nouveaux contenus à la main en supprimant les composant déjà ajoutés automatiquements ou modifiez l'existant.
- From the Adobe navigation bar, select the “Add text field” option on the document where you want it.
- Double click on the element to configure it.
- In the “Name” field on the General tab, fill in the Gonexa tag with the Salesforce field to be displayed. Copy and paste it from the assistant banner.
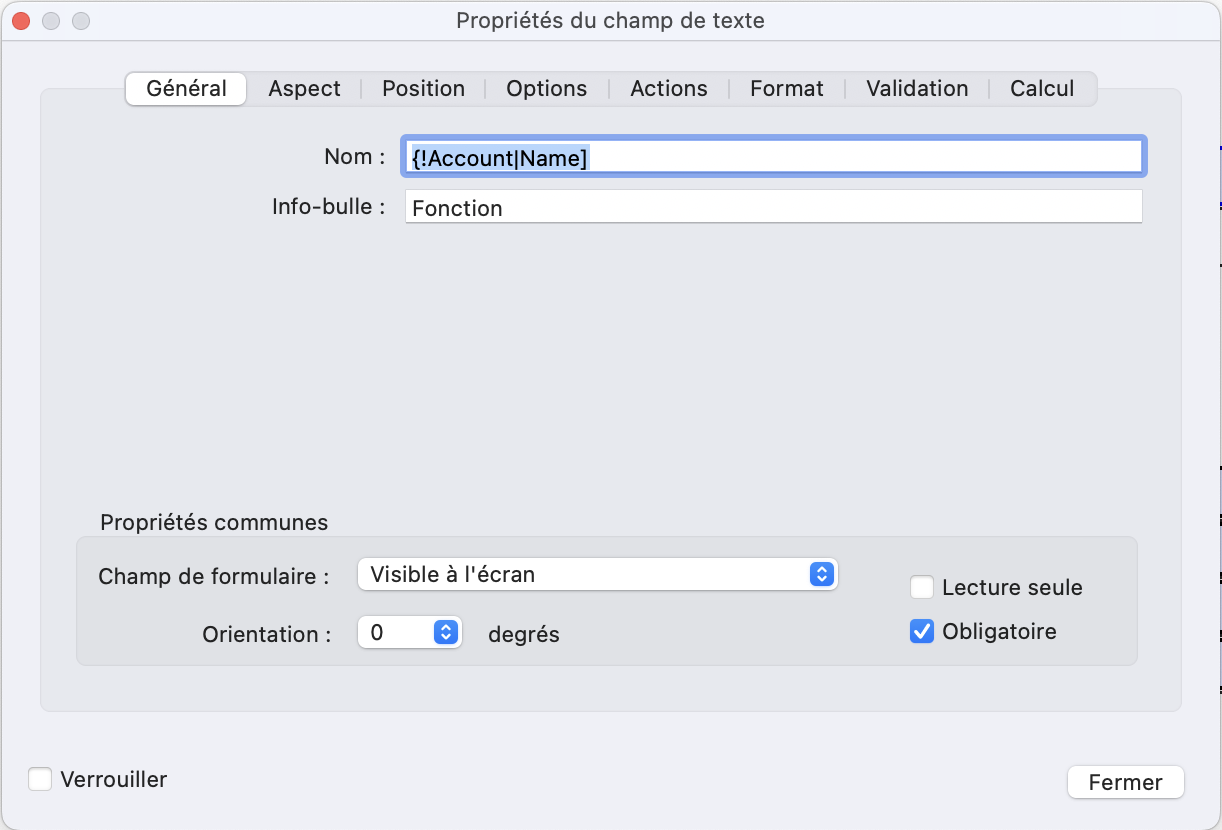
- Choose whether the item is mandatory or read-only by checking the “Read-only” box
- Manage the formatting of your tags in the “Appearance” tab: size, border color, background color, font...
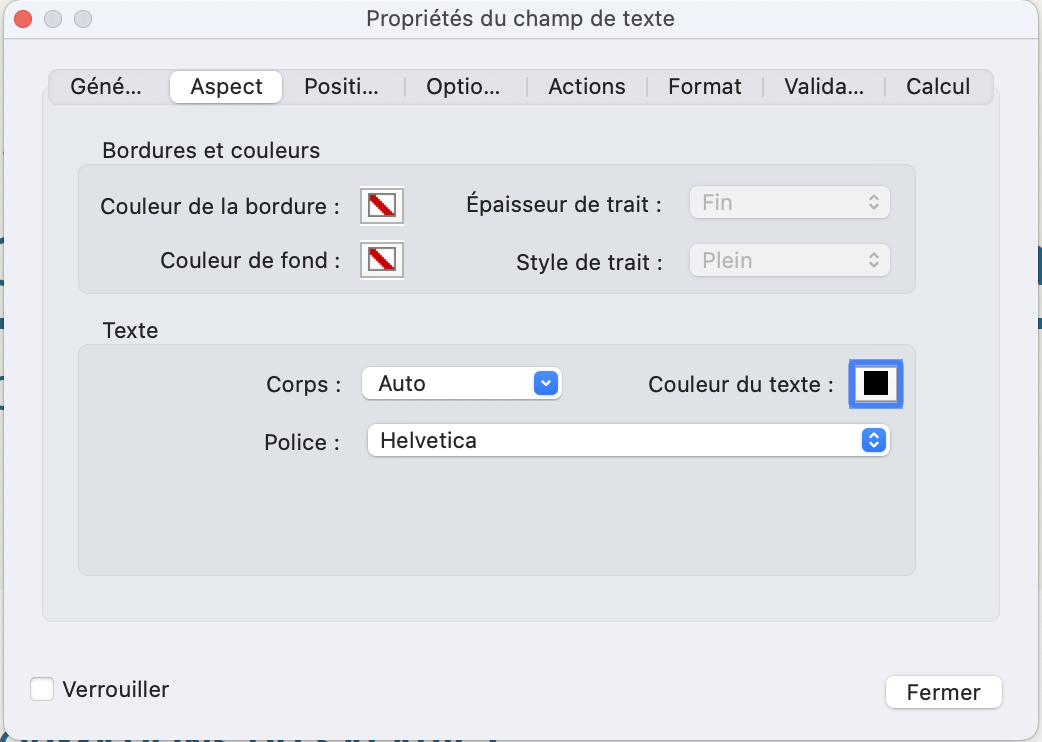
- Validate by clicking on Close
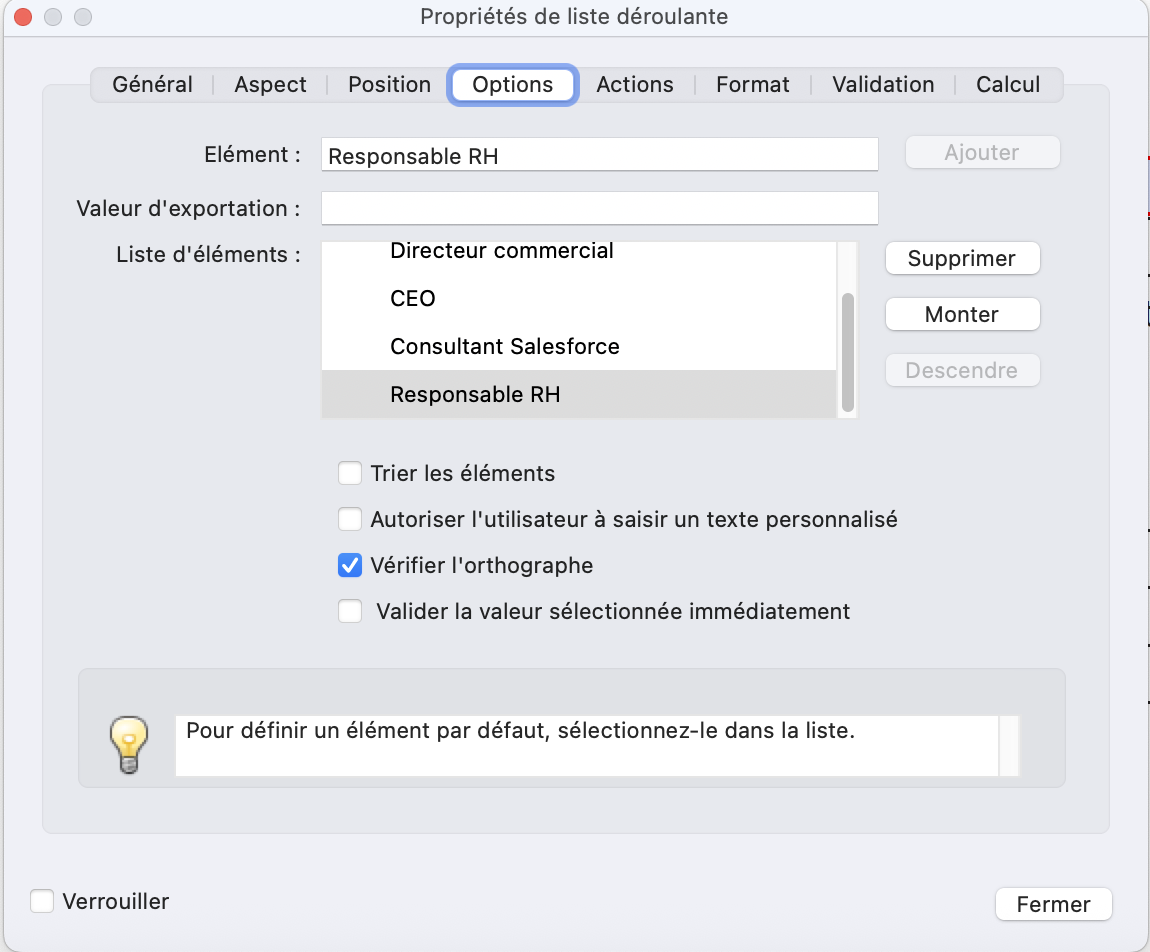
- From the Adobe navigation bar, select the “Insert drop-down list” or “Add a list of choices” option on the document, where you want it.
- Double click on the element to configure it.
- In the “Name” field on the General tab, fill in the Gonexa tag with the Salesforce field to be displayed. Copy and paste it from the assistant banner.
- From the Options tab, enter values from the selection list. These are the exact Salesforce picklist values. Add the items and order them. Select the default value and click Close.
Attention
Si une valeur de Picklist Salesforce n'existe pas, c'est à dire est vide, renseignez impérativement Null dans l'élement de valeur dans votre liste d'option.
- From the Adobe navigation bar, select the option “Add checkboxes to allow the selection of one or more options” and drop it on the page where you want it.
- Double click on the element to configure it.
- In the “Name” field on the General tab, fill in the Gonexa tag with the Salesforce checkbox field to be displayed. Copy and paste it from the assistant banner.
- The box will be checked if it is checked in Salesforce and gets a true/false value.
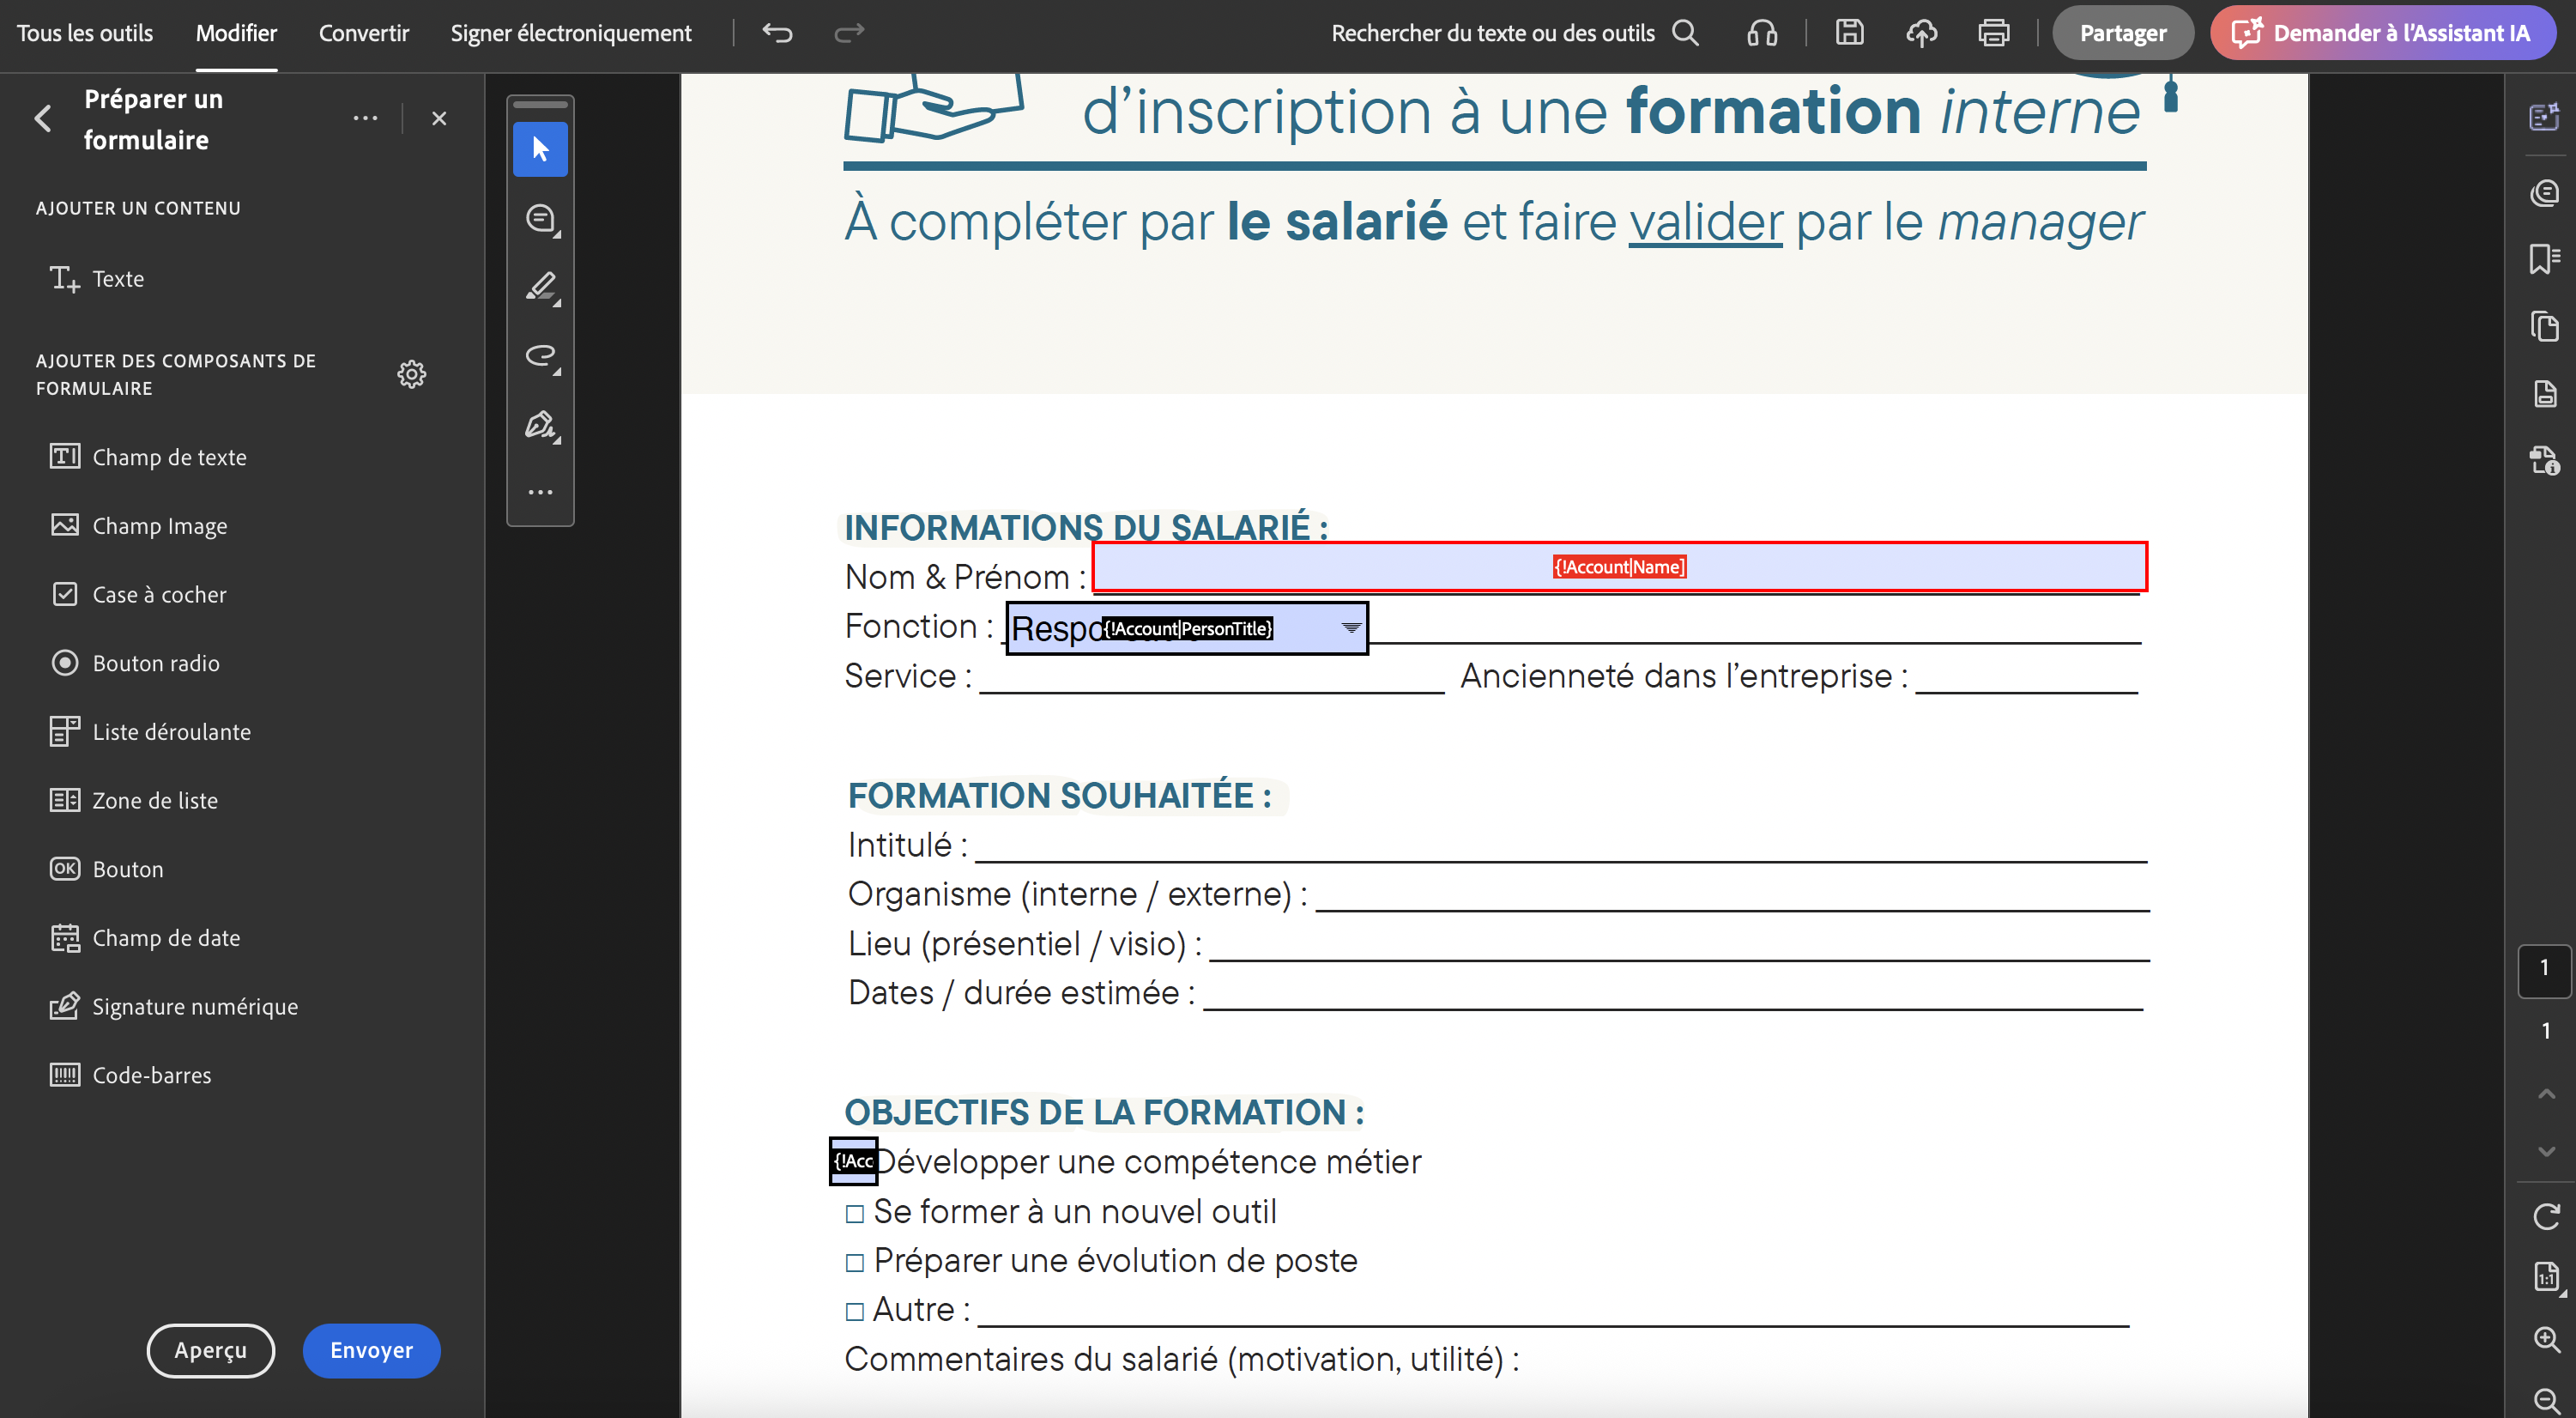
- Click on Close to confirm.
Attention
Une balise de type case à cocher (Checkbox) ne peut être appelée qu’une fois dans le document.
- From the Adobe navigation bar, select the “Add checkboxes to allow the selection of mutually exclusive options” tool and drop it on the page where you want it.
- Name them with the Gonexa tag created from the wizard.
- From the banner, modify the values: choice 1, choice, choice 3... with the name of the Salesforce PickList value.
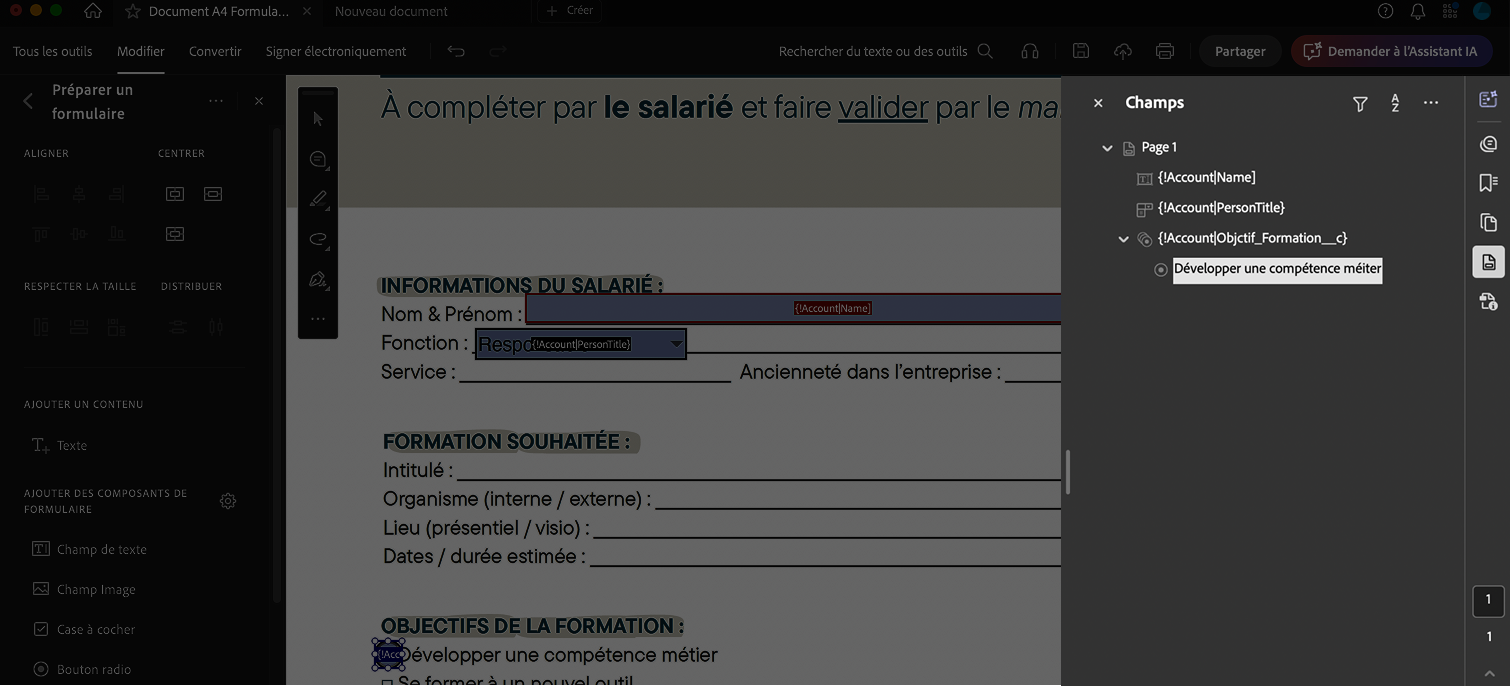
Une fois vos composants de formulaires ajouté, testez en cliquant sur "Aperçu" via Adobe Acrobat et chargez votre modèle dans Salesforce
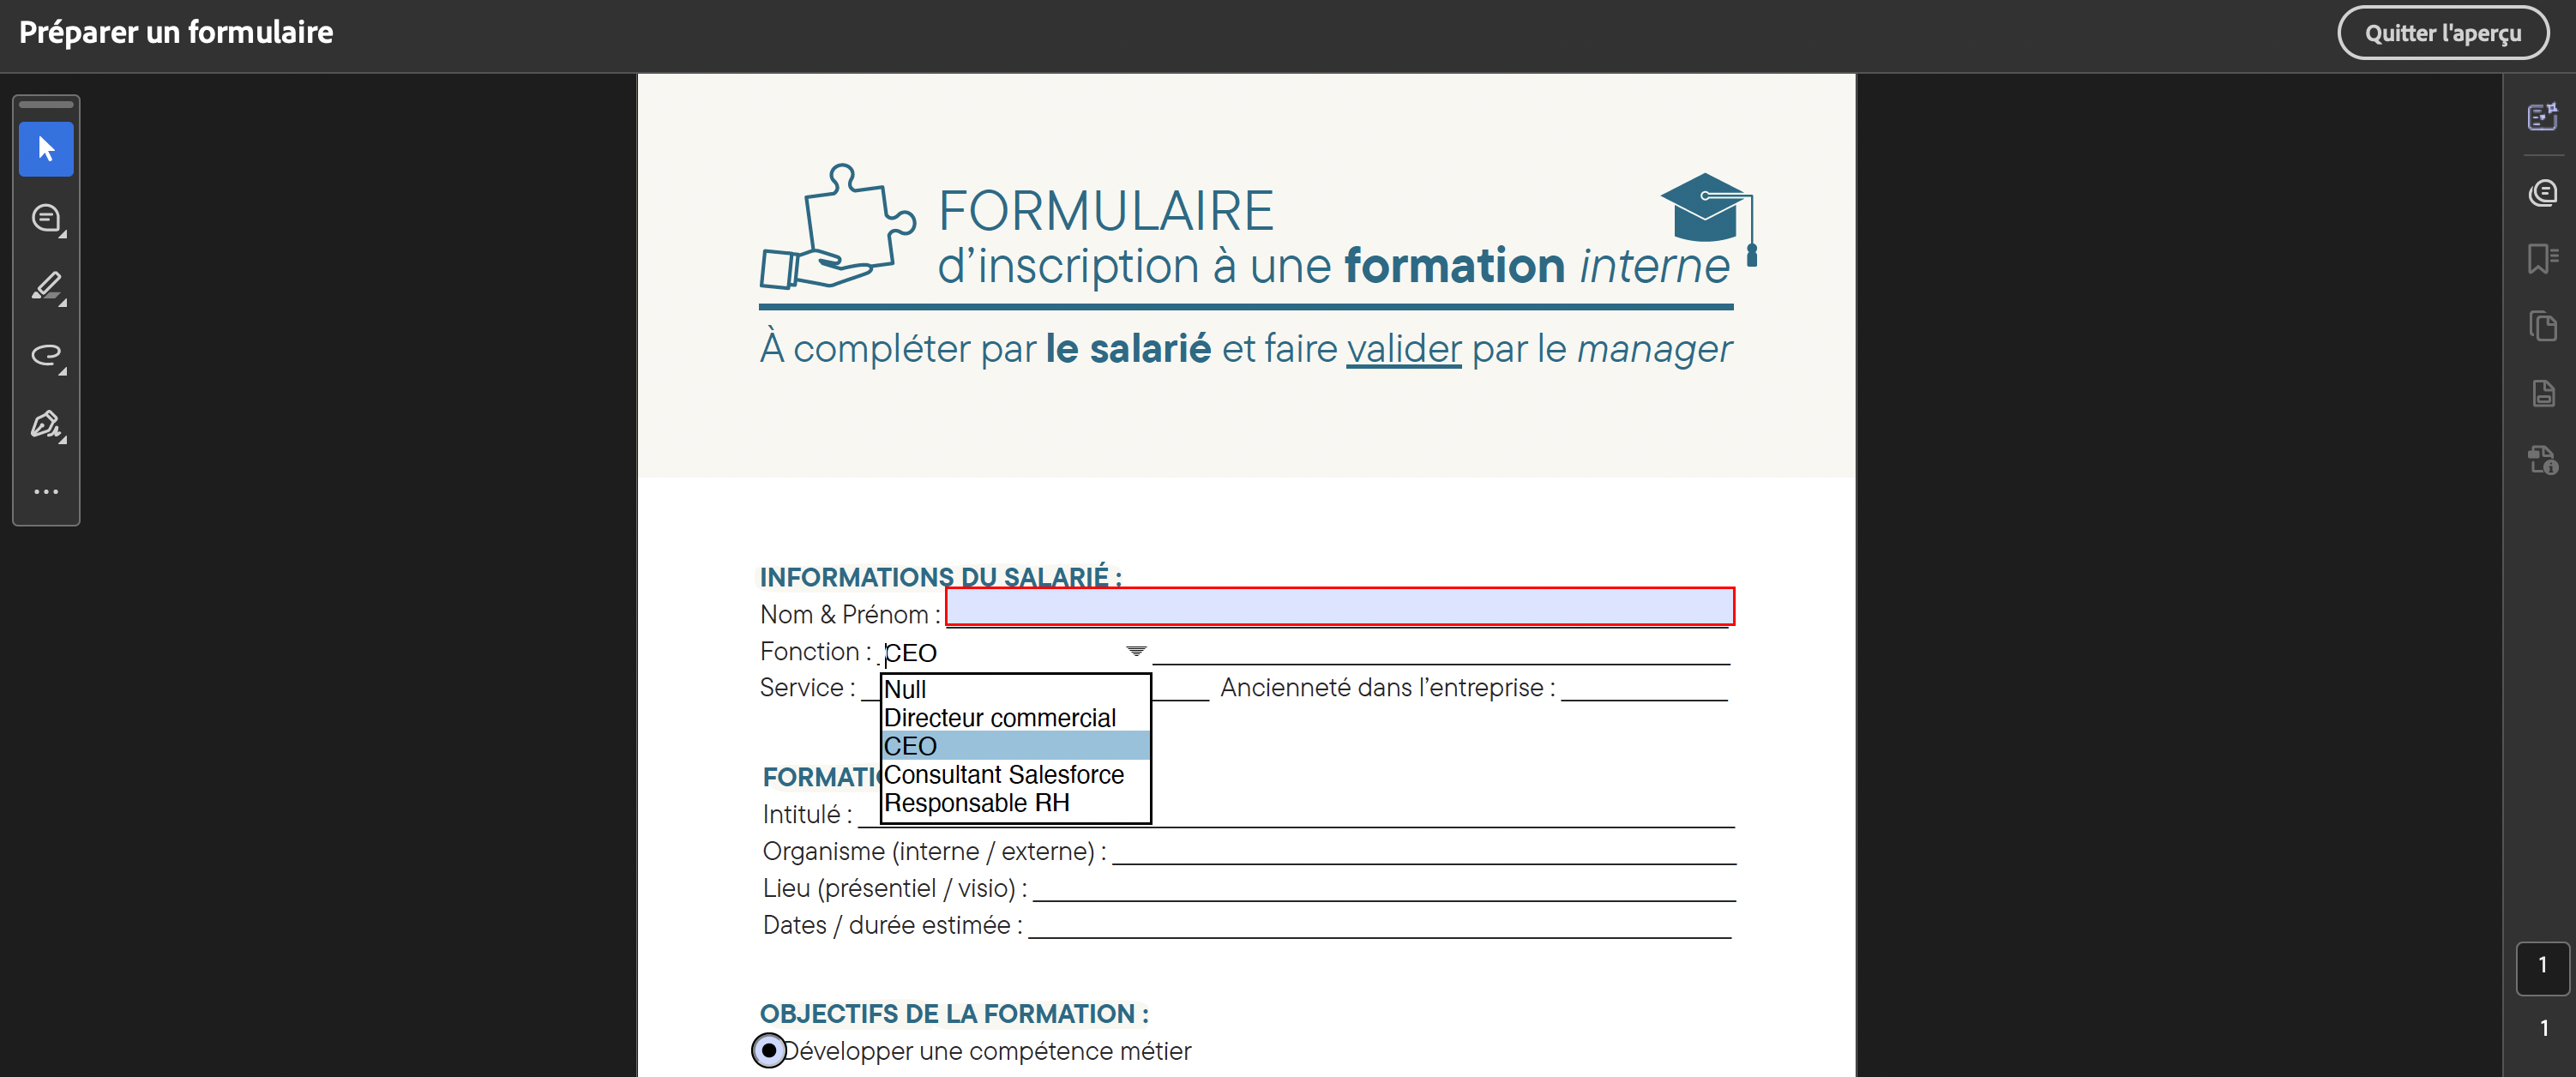
- Depuis votre modèle de document Salesforce, chargez la nouvelle version avec le PDF créé sur Adobe Acrobat
- Testez votre modèle comme d'habitude
Create an Excel document template
Create a document template in XLSX input format
We are going to break this training down into 4 steps :
- Creating a table in Excel
- Make calculations (Average, maximum, sum...)
- Create a formula
- Insert a pivot table
Pré-requis
✓ Savoir faire un modèle Word
✓ Avoir créé un modèle de document avec un objet enfant
Create a table in Excel
From the document template, add tags to the main objects at your convenience using the assistant banner.
To add tags to a child object, you must first have set up a child object in the document template.
Astuce
Veuillez définir le contenu imprimable de votre page Excel pour que tous les éléments puissent apparaitre sur une page PDF à la génération. Accédez à la version finale en activant le mode page de votre Excel.
- Insert a header in your document with column titles
- In a second line, insert the tags on the child object via the assistant
- Select the table, then from the Insert tab, click Table
- Check the box “My table has headers” if you had already set them up and click OK
- Once the board is created, go to the Table tab.
- In the Table Name box, name it with the label of the label of the child object to be set up in Salesforce. (Ex. QuotelineItem)
Save, upload your document to Salesforce, and test it out.
Make calculations (Average, maximum, sum...)
Do calculations like the average, the maximum, and the sum linked to your chart.
- Select the table already created
- From the Table tab, check the “Totals row” box
- An additional line will appear
- Select the new box, and on the arrow to choose the type of calculation to be carried out among the average, the maximum, the minimum, the sum...
Save, upload your document to Salesforce, and test it out.
Create a formula
Avoid creating a formula field in Salesforce and add logic directly into your Excel document.
- Add a column to your table and give it a name
- From the row in the new column, insert your Excel formula starting with “=”
- Select the box (s) involved in the calculation and build your formula in the following form: = C17 * 0.20
Astuce
Ajoutez les formats attendu : standard, monétaire, fraction, heure, date… pour faire apparaître le bon format à la génération.
Save, upload your document to Salesforce, and test it out.
Insert a pivot table
Display a graph and cross-check information dynamically in your document on a separate sheet.
- Select your board
- From the Insert tab, click Pivot Table
- From the “Create a pivot table” pop-up, check “New spreadsheet” to display the report on a separate spreadsheet and click OK.
- From the new sheet on which your pivot table will appear, check the boxes of the table fields to appear on your table.
- Move fields into target areas across filters, columns, rows, and values by dragging and dropping them.
- Click on the i next to the item to choose the display mode: sum, average, maximum...
Save, upload your document to Salesforce, and test it out.
Attention
Vous ne pourrez pas ajouter de balises Gonexa doc sur la même page que votre tableau croisé dynamique.
Display a graph and cross-check information dynamically in your document on a separate sheet.
- From your selected pivot table, select the graph you want to appear.
- Place it on the page where you want it.
Save, upload your document to Salesforce, and test it out.
Create a PowerPoint template
Create a document template in PPTX input format
We are going to break this training down into 3 steps :
- When should I create a PowerPoint template?
- How do I create a Powerpoint template?
- The specificities & limitations of the Powerpoint template
Pré-requis
✓ Savoir faire un modèle Word
✓ Avoir créé un modèle de document
When to create a PowerPoint template?
Create documents that can be generated in PDF or PowerPoint format to use a document as a slideshow.
Attention
Le format PowerPoint comporte des limites, si vous souhaitez utiliser ce format pour obtenir un document PDF en format horizontale, il est recommandé de se diriger vers la création d'un document au format Word horizontal.
Depuis Word, accédez à l'onglet Mise en page et sélectionnez l'orientation Paysage
If you want to design visual presentations in the form of slides, generate a PowerPoint document and modify it in this format
How to create a PowerPoint template
Set up your document template as usual and add one or more child objects as needed.
- Create slide masters to homogenize your presentations from the View tab
- Change the background layout, add shapes and images, and create the design you like
- From the Image Format tab, use foreground or background tools, manage automatic alignments, and reorder objects to create a quality document
Add dynamic tags using the Wizard where you want
- Add tags to the main object in the text boxes
- Add the tags on the child object in a table
Specificities & Limits of the PowerPoint template
Powerpoint is mainly distinguished by the management of pages, which are in the form of slides. The document can no longer be read continuously, but with independent slides
A PowerPoint template does not read continuously, but is made up of standalone slides. In the case of adding long text or a table, the text will not move to the next slide.
- Make sure the content fits on a slide, by checking that the text is not too long and that the key points fit on a page
- As part of a chart, check that all the information you want to display fits on a single slide. Adjust the font size or add a condition on the number of items to be displayed.
The principle remains the same as for a Word document, you can add child objects, dynamic images, resize on the main object, associated documents, raise relationships, filter tables...
Attention
Powerpoint comporte les limites et les incompatibilités suivantes :
- Pas d'ajout d'image dynamiques sur des objets engants
- La balise Date du jour Gonexa n'est pas compatible
- Les extensions de formats : Date, nombre, cauculs, RIch Text, ne sont pas pris en comptes
- Les conditions d'affichages ne sont pas compatibles PowerPoint
- L'ajout d'un modèle associé de type annexe dynamique n'est pas compatible avec un Powerpoint
- Les champs de type Rich Text ne sont pas pris en comptes
- Les retours à la ligne dans un champ texte dans lequel il y a des retours chariots ne sont pas pris en compte