

.svg.png)


Word best practices
We are going to go through 3 simple steps to design a Word document:
- Structuring the document
- Add content
- Organizing information
Prerequisites
✓ Have a Microsoft Word license
Structuring the document
Create a stable, consistent, and clean document by starting with structuring your document.
- Activate spaces, line breaks, page breaks, and section changes by clicking on the “Show layout marks” symbol from the Home tab
- From the Insert tab, choose the orientation of the document or section
- From the Design tab, choose the color of the background of the page, and its borders and watermarks
- From the Layout tab, choose the margin format: default or custom
Tip
Adjust spacing manually using the horizontal and vertical rulers. Go to the View tab and check the "Ruler" box if they are not visible.
Add content
Configure your headings, subheadings, and body text by creating your own default fonts from the Style pane tab on the Home screen.
Tip
Use the "Format Painter" tool to standardize fonts.
Gonexa supports the following standard Word fonts:
AngsanaNew
AngsanaUPC
Aparajita
ArabicTypesetting
Arial
ArialBlack
ArialNova
ArialNovaCond
ArialNovaCondLight
ArialNovaLight
Batang
BatangChe
BrowalliaNew
BrowalliaUPC
Calibri
CalibriLight
Cambria
CambriaMath
Candara
ComicSansMS
Consolas
Constantia
Corbel
CordiaNew
CordiaUPC
CourierNew
DaunPenh
David
DengXian
DengXianLight
DFKai-SB
DilleniaUPC
DokChampa
Dotum
DotumChe
Ebrima
EstrangeloEdessa
EucrosiaUPC
Euphemia
FangSong
FranklinGothicMedium
FrankRuehl
FreesiaUPC
Gabriola
Gadugi
Gautami
Georgia
GeorgiaPro
GeorgiaProBlack
GeorgiaProCond
GeorgiaProCondBlack
GeorgiaProCondLight
GeorgiaProCondSemibold
GeorgiaProLight
GeorgiaProSemibold
GillSansNova
GillSansNovaCond
GillSansNovaCondLt
GillSansNovaCondUltraBold
GillSansNovaCondXBd
GillSansNovaLight
GillSansNovaUltraBold
Gisha
Gulim
GulimChe
Gungsuh
GungsuhChe
Impact
IrisUPC
IskoolaPota
JasmineUPC
JavaneseText
KaiTi
Kalinga
Kartika
KhmerUI
KodchiangUPC
Kokila
LaoUI
Latha
Leelawadee
LeelawadeeUI
LeelawadeeUISemilight
LevenimMT
LilyUPC
LucidaConsole
LucidaSansUnicode
MalgunGothic
MalgunGothicSemilight
Mangal
Marlett
Meiryo
MeiryoUI
MicrosoftHimalaya
MicrosoftJhengHei
MicrosoftJhengHeiLight
MicrosoftJhengHeiUI
MicrosoftJhengHeiUILight
MicrosoftNewTaiLue
MicrosoftPhagsPa
MicrosoftSansSerif
MicrosoftTaiLe
MicrosoftUighur
MicrosoftYaHei
MicrosoftYaHeiLight
MicrosoftYaHeiUI
MicrosoftYaHeiUILight
MicrosoftYiBaiti
MingLiU
MingLiU-ExtB
MingLiU_HKSCS
MingLiU_HKSCS-ExtB
Miriam
MiriamFixed
MongolianBaiti
MoolBoran
MSGothic
MSMincho
MSPGothic
MSPMincho
MSUIGothic
MVBoli
MyanmarText
Narkisim
NeueHaasGroteskTextPro
NirmalaUI
NirmalaUISemilight
NSimSun
Nyala
PalatinoLinotype
PlantagenetCherokee
PMingLiU
PMingLiU-ExtB
Raavi
RockwellNova
RockwellNovaCond
RockwellNovaCondLight
RockwellNovaExtraBold
RockwellNovaLight,Rod
SakkalMajalla
SanskritText
SegoeMDL2Assets
SegoePrint
SegoeScript
SegoeUI
SegoeUIBlack
SegoeUIEmoji
SegoeUIHistoric
SegoeUILight
SegoeUISemibold, SegoeUISemilight
SegoeUISymbol
ShonarBangla
Shruti
SimHei
SimplifiedArabic
SimplifiedArabicFixed
SimSun
SimSun-ExtB
SitkaBanner
SitkaDisplay
SitkaHeading
SitkaSmall
SitkaSubheading
SitkaText
Sylfaen
Symbol
Tahoma
TimesNewRoman
TraditionalArabic
TrebuchetMS,Tunga
UrduTypesetting
Utsaah
Vani
Verdana
VerdanaPro
VerdanaProBlack
VerdanaProCond
VerdanaProCondBlack
VerdanaProCondLight
VerdanaProCondSemiBold
VerdanaProLight
VerdanaProSemiBold
Vijaya
Vrinda
Webdings
Wingdings
YuGothic
YuGothicLight
YuGothicMedium
YuGothicUI
YuGothicUILight
YuGothicUISemibold
YuGothicUISemilight
YuMincho
YuMinchoDemibold
YuMinchoLight
Incorporate new fonts when you save your Word.
Dans le cas inverse, elle sera remplacée par une police standard.
- In the menu, select Preferences
- In the dialog box (Microsoft) under Output and Share, select Save
- Under Font Embeds, select Embed fonts in the file.
.png)
Check "Embed only the characters used in the presentation" to reduce file size when saving.
- Click the File tab, then click Option (lower left corner of the window)
- In the left-hand column, select the "Save" tab.
- In the left column, select the Save tab

Check "Embed only the characters used in the presentation" to reduce file size when saving.
- Create headers and footers by double clicking at the top and bottom of the document
- Check the "Different First Page" box in the header or footer menu if you want to customize the elements on the first page.
- Add page numbers from the Insert tab by clicking Page Number. Go to Page Number Formats to set the desired format (1,2,3...) and the start of the numbering.
- From the Reference tab, click on Table of Contents and choose the type of table to insert or create a custom one
- Update the table of contents by right-clicking > Update, in case new titles have been added.
Tip
If you find any missing entries, make sure to set the text to display as a heading
- Add images to your document by clicking on insert: image or by dragging and dropping
- Optimize the size of your images by compressing them to make the most of your document
Tip
Go to File, click "Reduce File Size," and select Screen.
Organizing information
- It is recommended to avoid using text boxes
- You can create tables with invisible borders to structure your data
- Select the text in question, then, from the Layout tab, click on columns.
- Choose how many columns to show
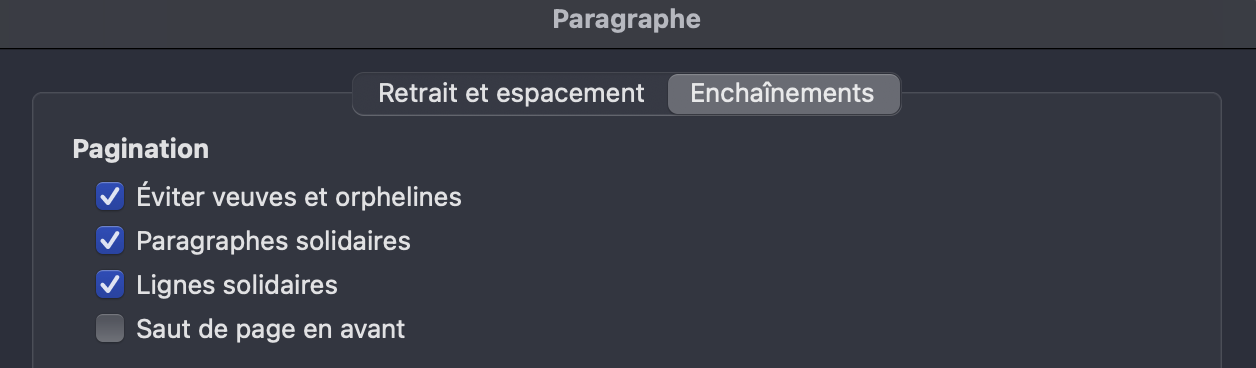
- To prevent rows in a table or paragraph from intersecting between two pages, select the block to split, and right-click to access paragraphs.
- In the sequence tab, check the box for interrelated paragraphs and interrelated lines. Save.
- Insert a page break to move to a new page cleanly
- Insert a section break to change the formatting from one section to another without affecting the entire document
The tables
- To repeat table headers, select the row or rows that make up the header you wish to repeat.
- Right-click > Table properties, then under Options, check "Repeat as header row at the top of each page." Click OK.
- Show gridlines to see the boundaries of tables that have no visible borders
- Click on your board, then click on the “Board Layout” tab
- Click on “Show grids” to activate it
- The gridlines are visible in the areas of the table without borders
Tip
Unlike borders, gridlines only appear on screen and will never print.