

Basic setup
This first step will guide you through the steps of installing our electronic signature solution.
Prerequisites
✓ Have installed and configured Gonexa Doc
✓ Download the latest version of the package, available from the AppExchange or your App account
✓ Have connected your environment in the Gonexa App
As of version 2.61, released in June 2026 (Biarritz), a new package version is available.
For existing clients, you are free to choose your preferred version based on the features you wish to unlock and your desired signing experience. Switching to the new Gonexa interface is optional.
For new clients—meaning new installations—please follow the installation steps for option 2.
Note
Be sure to contact support if the licenses are not active for your environment.
We are going to go through 2 steps to achieve this:
- Give access to users and to yourself
- Setting up the signature experience
Give users and yourself access
- In the “Gonexa Administration” tab, click on the “Sign” tab
- Click on “Admin”
- Assign authorization to the necessary users and to yourself for administrator uses
- Do the same for the user access part
Note
You can also modify user profiles to add permission set rights. If you choose this option, don't forget to grant access to the Last Delivery Link field in the Contact object.
Set up the signatory experience
- Access standard Salesforce email templates via the app launcher
- Create a new email template by giving it a name
- Select a public folder to store
- Define an object and save
- The essential element to place in the template is the link to the signatory interface. It is imperative that you place this tag in your template: {{Recipient.gnx__last_delivery_link__c}}}
- If you want to start from a pre-designed template, copy the Gonexa HTML email template by clicking the button below
- Then simply click on “Source” at the top left of the editor and paste the HTML code you just copied.
- By clicking on the “Source” button again you can now visualize the result
- Personalize the template as you see fit with your logo and the necessary information
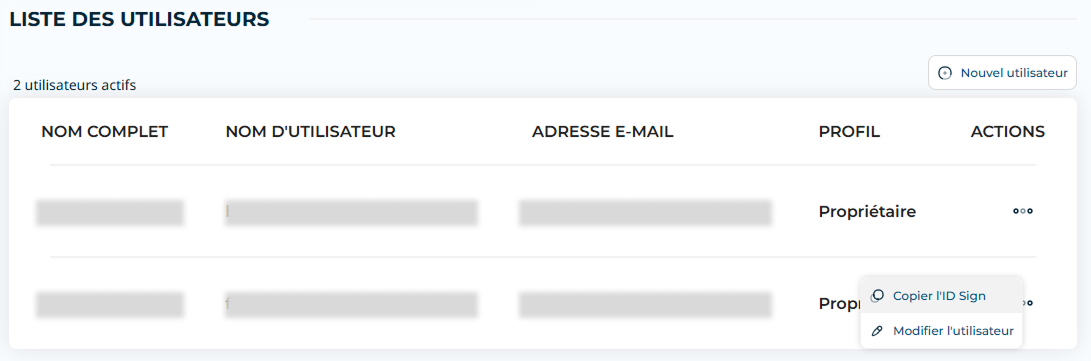
- Log in to your account on the Gonexa App: https://app.gonexa.fr/
- Go to the “Profile & Users” section
- In your user's line, click on the 3 dots, then on “Copy Sign ID” to copy the user ID in order to paste it into the custom setting in the next step
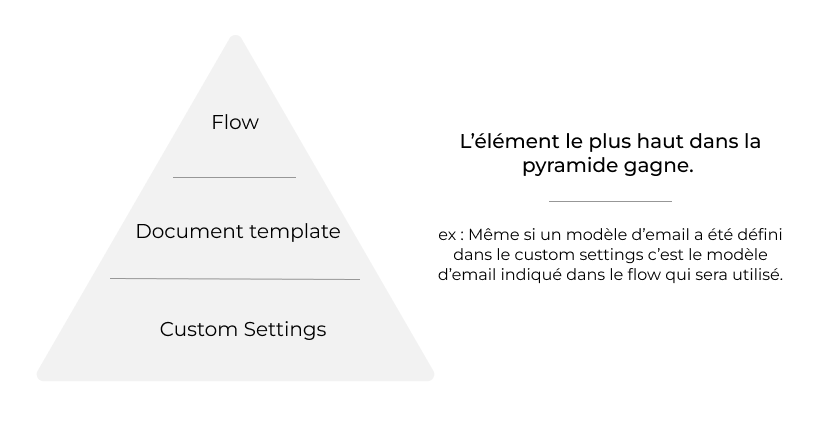
Please take into account the hierarchy of parameters next to make your configuration choices:
- In the quick configuration search, look for “Custom Settings”
- In the proposed list, click on Manage for the “Gonexa Sign” line
- Click on “New” (first button) or “Edit” depending on your case
Brand image:
Go to your Gonexa App account to set up your Branding. Consult The article on the creation of Branding [Optional]
Default email template:
Salesforce ID of the email template used for signature requests
App Sign ID:
Paste the user ID Sign retrieved previously into the Gonexa App
Phone field:
API name of the phone field on the Contact [MobilePhone if left empty]
Double authentication:
3 possible choices: “SMS by default”, “SMS” or “Email”
Validity period:
Number of days before the signature link expires
OrgWideEmailAddress:
Enter sender email address [Optional]
Note
Please ensure you have set up an organization email address and confirmed it via email beforehand.
Follower Email Template:
Salesforce ID of the email template used for followers [Optional]
Allow signer to refuse the signature:
Check the box if you want to allow signers to refuse to sign [Optional]
Grant access to the users and to yourself
- In the "Gonexa Administration" tab, click on the "Sign" tab
- Click on "Administrator" or "Admin" in English
- Assign authorization to the necessary users and to yourself for administrative purposes
- Do the same for the user access section
Note
You can also modify user profiles to add permission set rights. If you choose this option, don't forget to grant access to the Last Delivery Link field in the Contact object.
Configure the signer experience
- Log in to your App account.
- Go to the "Sign" tab, then to "Email template".
- Click "New email template".
- Select the desired template type from: Signature request, Follower, Reminder.
- Give your email template a name; this name will allow you to identify it easily.
- Select a branding if you wish to customize the logo displayed in the email. If you have not configured any branding, refer to the article
Create Branding - Customize the predefined email subject and body.
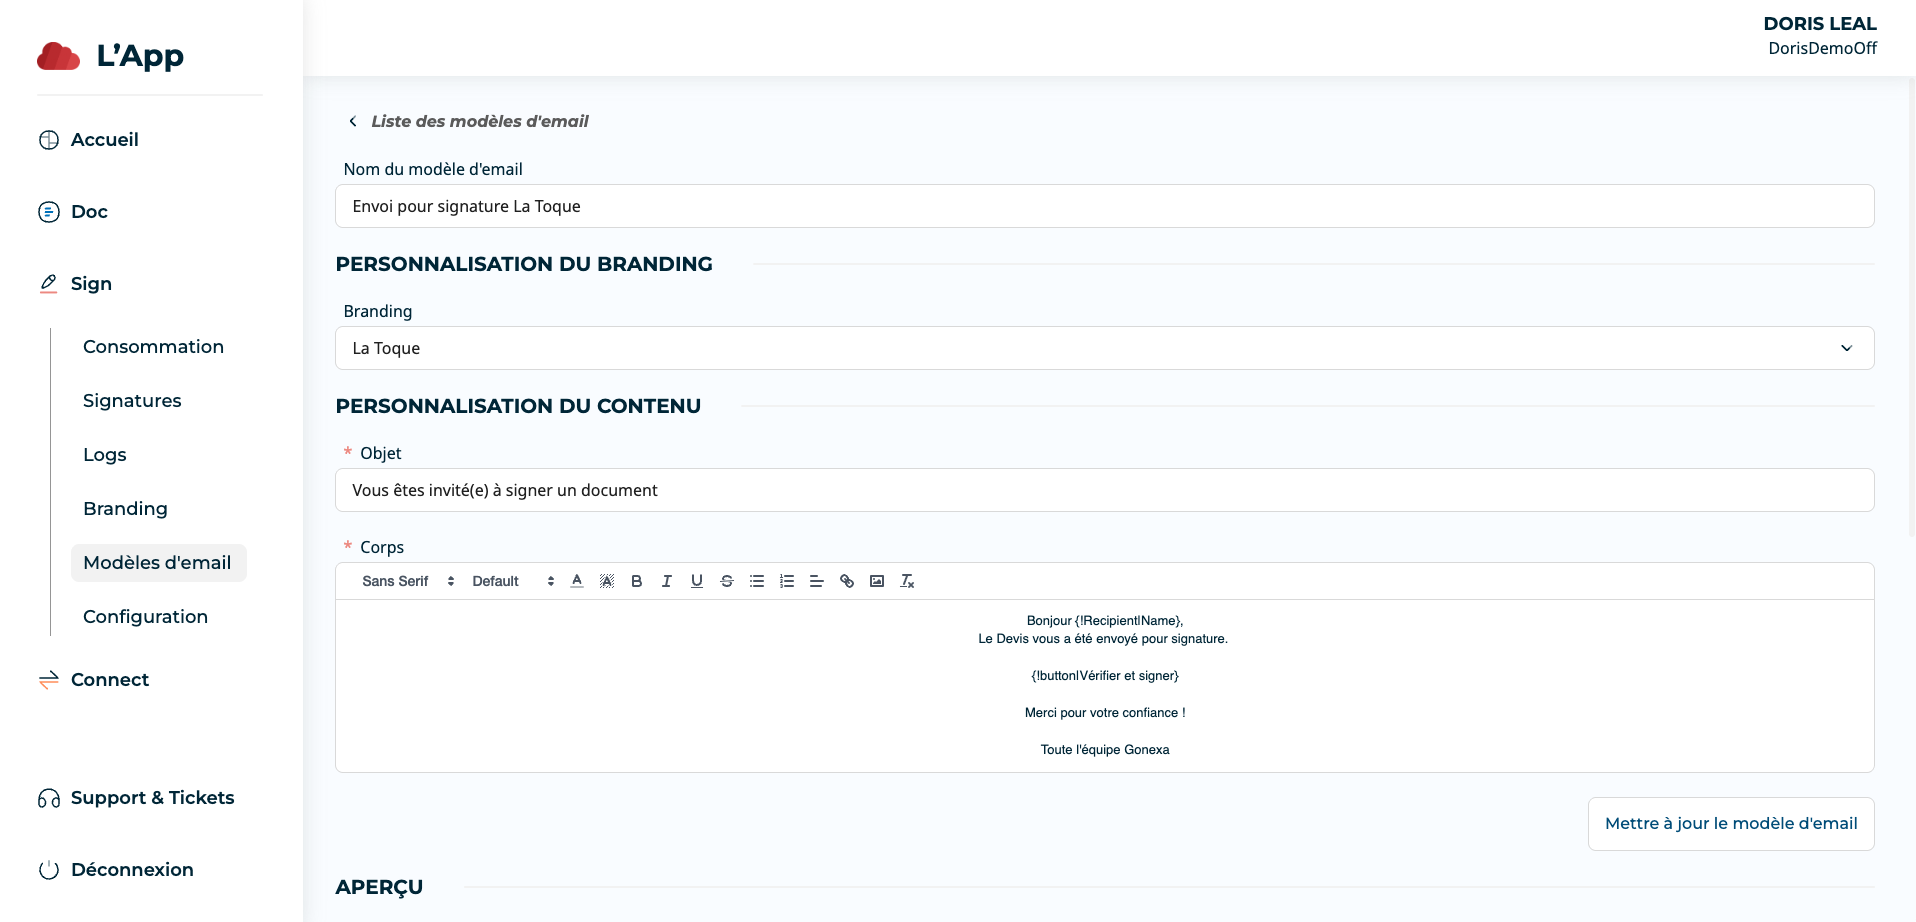
Important
Do not delete the “{!button|Vérifier et signer}” tag. This button is required for the signature process and must remain in the email template.
- From your App account, go to the "Sign" tab and then to "Configuration"
- Click "New Configuration" to be redirected to the configuration creation page.
- Enter the following requested information:Configuration Name
Used to identify the Sign configuration.SALESFORCE SYNCHRONIZATION
Interface user
The user designated to manage the connection and perform updates in Salesforce. They must be logged into the Salesforce environments and have the Gonexa Sign Admin permission set assigned in Salesforce.Branding [Optional]
Select an existing branding. This must have been created in the App beforehand. See the article on creating branding.EMAIL TEMPLATES
Select the template(s) to associate
Signature request templates: Initial email sent to the signer to access the document for signature
Reminder template: Email used for automated follow-ups
Follower template: Email sent to followers to access the document and track its progress
Signed document templates: Confirmation email sent to the user who initiated the process once the document has been signedSENDING CONFIGURATION
Some fields include default values. These can be modified if they do not meet your business requirements, including:
Default language: French
Validity period: [Number] in days
Two-factor authentication method: SMS, SMS by default (means SMS will be chosen if the contact has both an SMS number and an email address), Email, No MFA
Phone country code: +33 by default
Salesforce organization-wide address: You can enter an email address to be used as the sender address for signature requests. This must be configured and verified in Salesforce beforehand.
Allow signature refusal: Check this box to allow the signer to decline signing a document.
Signer sequencing: Check this box to enable signer sequencing, which allows you to define a specific order for signatures.
Enable initials: Check this box to add initials when signing a document.
Enable reminders: Check this box to enable and configure automatic reminders and access their settings.REMINDER SETTINGS
Access the automatic reminder settings. If the "Enable reminders" box is checked:
Reminder frequency: Once a day, once every two days, or once a week
Number of reminders: [Number] between 1 and 10
Salesforce organization-wide address: You can specify an email address to be used as the sender for signature reminders. This address must be configured and verified in Salesforce beforehand.
- Check the "Default Sign Configuration" option.
This configuration will become the primary Sign Configuration and will be used for all Salesforce environments connected to the App. - Click "Create configuration" to finalize

<head>
<title></title>
<style type="text/css">a.button {appearance: button; text-decoration: none; cursor: pointer; padding: 10px 20px! important; border-radius: 30px; background-color: #EAF5FF; color: #428AEF;}
</style>
</head>
<body style="height: auto; min-height: auto;">
<table align="center" bgcolor="#f9fafc" border="0" class="main-template" style="background-color: rgb(249, 250, 252);" width="100%">
<tbody>
<tr>
<td align="center">
<table border="0" class="templateContainer" style="max-width:590px!important; width: 590px;" width="590">
<tbody>
<tr>
<td align="center">
<table border="0" class="rnb-del-min-width" id="Layout_0" name="Layout_0" style="min-width:590px;" width="100%">
<tbody>
<tr>
<td align="center" class="rnb-del-min-width" style="min-width:590px;">
<table border="0" height="38" width="100%">
<tbody>
<tr>
</tr>
</tbody>
</table>
</td>
</tr>
</tbody>
</table>
</td>
</tr>
<tr>
<td align="center">
<div style="background-color: rgb(255, 255, 255);">
<table border="0" class="rnb-del-min-width" id="Layout_10" name="Layout_10" style="min-width:590px;" width="100%">
<tbody>
<tr>
<td align="center" class="rnb-del-min-width" style="min-width:590px;">
<table bgcolor="#ffffff" border="0" class="rnb-container" style="background-color: rgb(255, 255, 255); border-radius: 0px; padding-left: 20px; padding-right: 20px; border-collapse: separate;" width="100%">
<tbody>
<tr>
<td height="20" style="font-size:1px; line-height:20px; mso-hide: all;"></td>
</tr>
<tr>
<td class="rnb-container-padding" style="text-align: center;"><img alt="Logo-64x64" src="https://cdn.prod.website-files.com/6266bdee7bba3ff58801d972/6290f781b58fd1580bc14d15_Logo-long-x300px.png" style="max-width: 1489.53px; width: 212.995px; height: 47.9948px;" title="Logo-64x64" /></td>
</tr>
<tr>
<td height="20" style="font-size:1px; line-height:20px; mso-hide: all;"></td>
</tr>
</tbody>
</table>
</td>
</tr>
</tbody>
</table>
</div>
</td>
</tr>
<tr>
<td align="center">
<div style="background-color: rgb(255, 255, 255); border-radius: 0px;">
<table border="0" class="rnb-del-min-width" name="Layout_14" style="min-width:100%;" width="100%">
<tbody>
<tr>
<td align="center" class="rnb-del-min-width">
<table bgcolor="#ffffff" border="0" class="rnb-container" style="background-color: rgb(255, 255, 255); padding-left: 20px; padding-right: 20px; border-collapse: separate; border-radius: 0px; border-bottom: 0px none rgb(200, 200, 200);" width="100%">
<tbody>
<tr>
<td height="20" style="font-size:1px; line-height:20px; mso-hide: all;"></td>
</tr>
<tr>
<td align="left" class="rnb-container-padding">
<table border="0" class="rnb-columns-container" width="100%">
<tbody>
<tr>
<th class="rnb-force-col" style="text-align: left; font-weight: normal; padding-right: 0px;">
<table align="left" border="0" class="rnb-col-1" width="100%">
<tbody>
<tr>
<td style="font-family: Arial, Helvetica, sans-serif, sans-serif; color: rgb(60, 72, 88);">
<div style="text-align: center;"><br />
<span style="font-size:22px;">Hello {{{Recipient.Name}}}</span> <br />
A document has been sent to you for signature <br />
<br />
</div><div class="align" style="text-align: center;"><a class="button" href="{{{Recipient.gnx__Last_delivery_link__c}}}">Verify and sign</a></div> <div style="font-size: 14px; text-align: center;">
<table align="center" border="0" class="rnb-col-1" width="550">
<tbody>
<tr>
<td>
<div style="text-align: center;"></div><table align="center" border="0" class="rnb-col-1" width="550">
<tbody>
<tr>
<td>
<table border="0" class="rnb-col-1" width="550">
</table><div style="text-align: center;"><span style="color:#3c4858;"><span style="font-size:24px;"><span style="font-size:22px;">Thanks for your trust! </span></span></span><br />
- <br />
<br />
The whole Gonexa team</div>
</td>
</tr>
</tbody>
</table>
</td>
</tr>
</tbody>
</table>
</div>
</td>
</tr>
</tbody>
</table>
</th>
</tr>
<tr>
<th class="rnb-force-col" style="text-align: left; font-weight: normal; padding-right: 0px;"></th>
</tr>
</tbody>
</table>
</td>
</tr>
</tbody>
</table>
</td>
</tr>
</tbody>
</table>
</div>
</td>
</tr>
<tr>
<td align="center">
<table border="0" class="rnb-del-min-width" id="Layout_" name="Layout_" style="min-width:590px;" width="100%">
<tbody>
<tr>
<td align="center" class="rnb-del-min-width" style="min-width:590px;">
<table border="0" height="30" width="100%">
</table>
</td>
</tr>
</tbody>
</table>
</td>
</tr>
<tr>
<td align="center">
<div style="background-color: rgb(249, 250, 252);"></div>
</td>
</tr>
<tr>
<td align="center">
<div style="background-color: rgb(249, 250, 252);">
<table border="0" class="rnb-del-min-width rnb-tmpl-width" id="Layout_7" name="Layout_7" style="min-width:590px;" width="100%">
<tbody>
<tr>
<td align="center" class="rnb-del-min-width" style="min-width:590px;">
<table align="center" bgcolor="#f9fafc" border="0" style="padding-right: 20px; padding-left: 20px; background-color: rgb(249, 250, 252);" width="100%">
<tbody>
<tr>
<td height="20" style="font-size:1px; line-height:20px; mso-hide: all;"></td>
</tr>
<tr>
<td style="font-size:14px; color:#888888; font-weight:normal; text-align:center; font-family:Arial,Helvetica,sans-serif;">
<div>© 2023 Gonexa</div>
</td>
</tr>
<tr>
<td height="20" style="font-size:1px; line-height:20px; mso-hide: all;"></td>
</tr>
</tbody>
</table>
</td>
</tr>
</tbody>
</table>
</div>
</td>
</tr>
</tbody>
</table>
</td>
</tr>
</tbody>
</table><div id="" style="left: 812px; top: 1312px;"><div id="" style="left: 812px; top: 1312px;"><div id="" style="left: 1070px; top: 116px;"><div id="" style="left: 1070px; top: 116px;"></div></div></div></div>
</body>
</html>

- Go to the document generated with Gonexa Doc.
- Change the lightning page layout by clicking “Edit Page” by clicking on GD
- Look for the custom component “Gonexa Sign - Send for Signature”
- Drag and drop the component to the desired location on the page.
- Save & activate the page for the profiles or applications you want.
Note
The component will not be visible if no recipient is configured in the document template.