

Build Sign template
Set up your first Gonexa Sign template, set up and place signers.
We are going to go through 3 simple steps to achieve this:
- Place one or more signatures in the document
- Add fillable fields to the signature
- Configure the document to be sent for signature
Prerequisites
✓ Gonexa Sign installation and configuration
✓ Creation of a Gonexa Doc document template
✓ Package updated to the latest version
Choose the shipping method
- On your document template, go to the Sign tab
- In the Signers component, click Configure
- Select the required signature certification level. The selectable values depend on the products subscribed to in your contract.
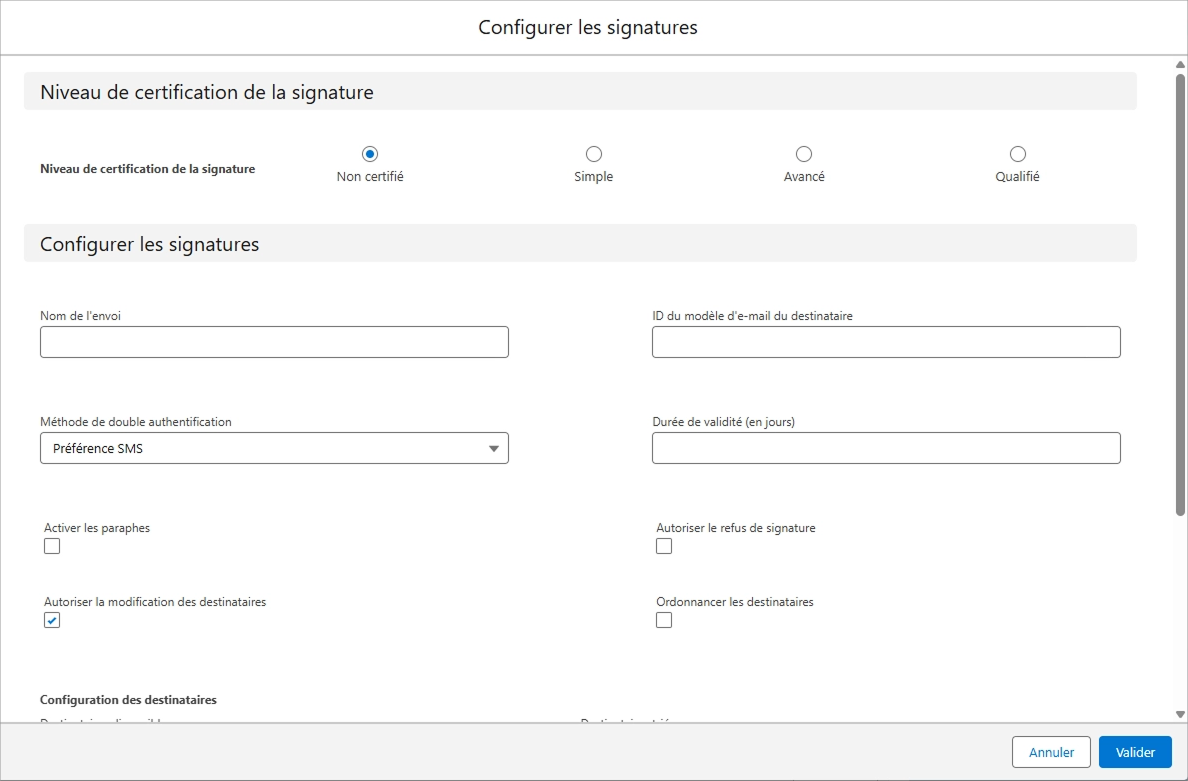
Configure the document to be sent for signature
Note
The values entered in the Gonexa Sign custom settings apply by default to the entire Salesforce organization.
However, you can override these settings directly within each document template. This allows you to customize the signing experience (email template, MFA, etc.) for a specific template.
- Procedure name : Give your procedure a default name. It will be visible to your sender from Salesforce and will allow him to have an overview of the statuses of the signatories.
- Signer email template ID : Copy and paste the email template ID into the Default email template field if you did not enter it in the custom setting.
Note
The email template must be public and specified in the custom settings, within the document template, or at the flow level.Tip
To improve the delivery of signature request emails, please set the access level to "All email" in your Salesforce Deliverability settings. - MFA method : Choose the two-factor authentication method from the dropdown list. Note that the one set in the Gonexa Sign custom setting controls the entire application.
- Validity period : In the “Validity period” field, set the number of days during which you want to give the signatory the opportunity to sign. if you did not enter it in the custom setting.
- Activate initials : You have different parameters to activate or not depending on your business process:
- Allow signers to decline signature : Check this box if you want signers to be able to refuse to sign a document
- Allow Signers Edit : Check this box if you want to allow users to edit signers before sending the document
- Activate Sign Order : if you want to create a signatory order
You can sort recipients in a specific order. If you check the “Schedule recipients” box, the second signatory will be able to sign only if the first set has signed the document.
Note
For a contact to be eligible, they must have a first name, a last name, and a valid email address or mobile phone number, depending on the chosen authentication method.
Place one or more signatures in the document
- From the configuration of your document template, go to the Sign tab
- In the Signers component, click “New” to add a signer
Note
This button is greyed out if you have not selected a signature level. Refer to step 1.
- Enter the following information:
Type:
Function of the signer to identify him (ex: Customer, Supplier, Partner, etc.)
Default contact:
The field that references the default contact
Contact search filter:
Allows you to limit the list of signatory contacts
Example: Find the contact on Prospect accounts
Account.Type = 'Prospect'
Signer display filter:
This filter makes it possible not to display the choice of a type of signatory in case your business process does not require it.
Example: Show if the Vendor Signature box is checked supplierSignature__c = 'true'
You can also make a personalized request in order, for example, to have only the contacts from the estimate account.
- In this case, we choose “Custom Query” when choosing the contact search filter.
- Then we fill in a SOQL query
For example: accountID IN (Select accountId from Quote where Id = {recordid})

Add signature locations
- Access your Gonexa Doc document template on which to place the signature (s)
- Open the assistant using the Go to tags button
- Access the different types of signers in the “Add a signature” block
- Click on a signatory to copy the signature tag and paste it into your document where you want
Note
The signature tag looks like this: {!s1}
Please ensure the signature tag is not split across two lines. It must remain complete!
Add the recipient listing component
You can add the recipient tracking component to your signature context (Quote, Opportunity, etc.)
- Go to the Lightning page for the desired object
- Drag and drop the “Gonexa - Listing recipients” component to the desired location on the page
- You will thus have visibility on the signatories as well as their status.
