

Sign interactions and fillable fields
Retrieve data entered at the time of signing to insert it into Salesforce fields or only into the signed document
Pré-requis
✓ Installation et paramétrage de Gonexa Sign
✓ Création d'un modèle de document Gonexa Sign avec un emplacement de signature
✓ Avoir le permission set Gonexa Sign Admin
✓ Avoir au minimum la version de package 2.10
Sign interactions
On a document template, the objects on which interactions are possible are as follows:
- The main purpose of the document template: for example “Opportunity”
- The parent object of the main object: for example the opportunity account
- Secondary objects configured on the document template
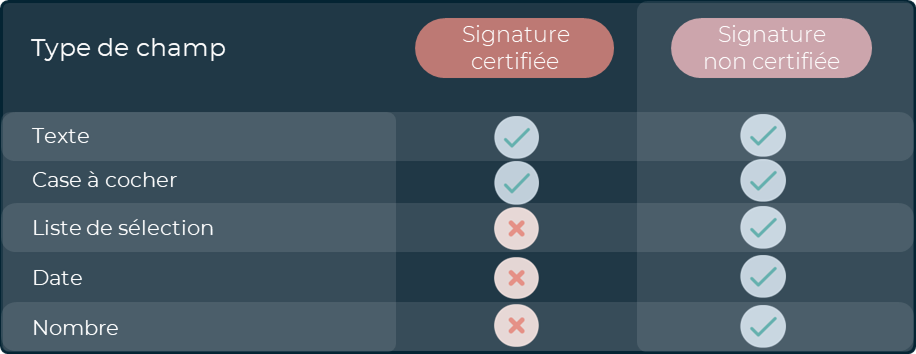
Before setting up your interactions, check the compatibility of field types according to your signature level:
Astuce
A noter toutefois qu’il est possible, pour le signature certifiée, d’utiliser une interaction de type texte pour un champ Salesforce de type nombre ou devise.
Place one or more interaction tags in the document
- Open the Assistant and find the field you want to add an interaction for
- Click on the 3 dots, select “Create an input field”, choose the recipient concerned and click on Copy
- You can then paste the tag where you want it on your document.
Set up interactions
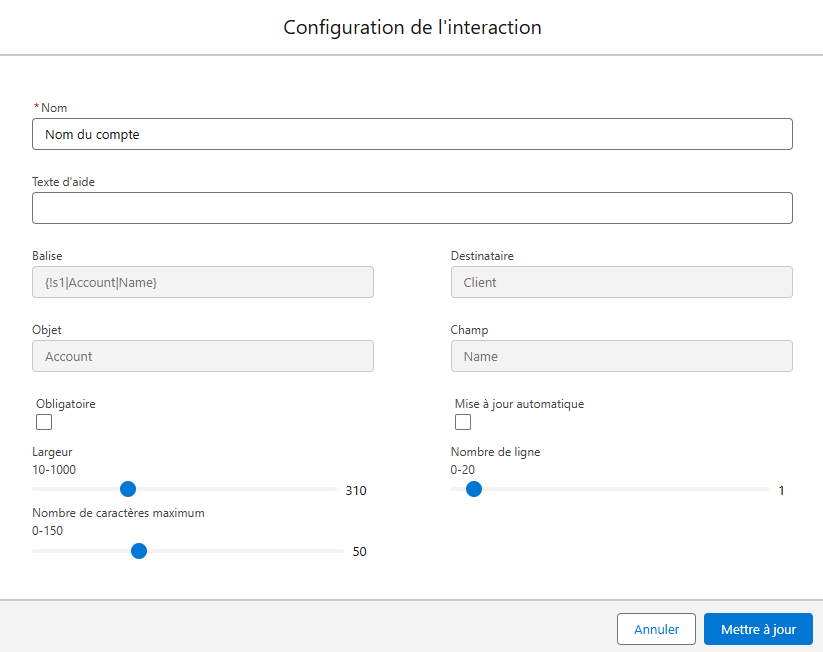
The document will then be scanned to identify all the interaction tags. You will find the interactions identified in the “Interactions Configuration” component in the Sign tab of the document template.
Here you'll find the Salesforce field label, interaction tag, recipient, and field type.
It is possible to personalize each interaction via the arrow at the end of the line:
- Name : Named by the field label in Salesforce by default, but can be customized. This will be the information that will be visible to the signatory when filling in the data
- Help text : add an instruction here to guide the signatory in completing the data
- Required : check this box if the required information must be filled in by the signatory to sign the document
- Is Autofilled : check this box if you want to pre-fill the field of the generated document with the data found in Salesforce
Attention
Attention cette option est uniquement disponible pour les signatures non certifiées - Auto update : check this box if you want the information entered by the signatory at the time of signing to be automatically updated in the associated Salesforce record, without prior verification by the user
- Width : adjust the width of the field to be displayed in the document
- Row amount : Adjust the number of lines to be displayed when the signatory enters information
- Max length : adjust the maximum number of characters expected
Generating and sending the document for signature
At the time of signing the document, the signatory is invited to fill in the requested information and to sign the document.
From the recipient object, you will find the “Data Update” component that displays the information entered at the time of signing, and allows the sender to accept the changes or to archive them.
Attention
Pensez à glisser déposer le composant Lightning personnalisé Gonexa - Listing Recipients sur la page de l’objet de contexte pour avoir un accès rapide à la donnée remplie et valider la synchronisation rapidement.

From the recipient, it is possible to:
- Accept bulk changes by selecting the lines via the checkboxes and then clicking the “Accept change” button. This action will update the data in the designated fields in the designated objects with the “New Value” values present on the rows
- Accept a change individually by using the arrow on the required line, by clicking on the “Accept modification” action. This action will update the data in the designated field in the designated object with the “New Value” present on the line
- Archive changes in bulk by selecting the rows using the checkboxes and then clicking on the “Archive selection” button. This action will put the designated lines into the “Archived” status.
- Archive a modification individually using the arrow on the required line, by clicking on the “Archive” action. This action sets the designated line to the “Archived” status
- Reset a change by using the arrow on the required line, by clicking on the “Reinit” action. This action is only available if the line is in the “Updated [Manual]” or “Updated [Auto]” status. It will allow you to update the data in the designated field in the designated object with the “Old Value” present on the line, this value is the value that was present in the field before the update
Meaning of statutes
- Updated [Auto] : This status indicates that the value entered by the signatory when signing the document was automatically inserted into the designated field of the designated object, as soon as the document was signed
- Updated [Manual] : This status indicates that the value entered by the signatory when signing the document was accepted by the user and therefore inserted into the designated field of the designated object
- Archived : This status indicates that the value entered by the signatory when signing the document was not accepted by the user but that it was processed
- Pending : This status may indicate two different cases. Either the signatory has not yet signed the document, or the value entered by the user when signing has not yet been processed
- Error : This status indicates that an error occurred while updating the designated field of the designated object with the value entered by the signatory. In this case, there is a help text showing the error that occurred
Fillable fields
You can add check boxes, dynamic text boxes, or even statements to be filled in by the signatory before signing the document, either mandatory or optional.
This information will be added to the document after it is signed, and there is no data in Salesforce fields.
- From the Assistant, access the signer on which you want to add fillable fields
- Access the “Mention” block
- Personalize the text to your liking or keep the mention Read and Approved on %date%, which will show the date of the day of signature
- Copy the tag and paste it into your document where you want
Attention
Veillez à ne pas couper la balise sur deux lignes
- Go to the “Checkbox” block
- Give the check box a title
- Copy and paste the tag into the document where you want
Attention
Veillez à ne pas couper la balise sur deux lignes
Astuce
Notez que vous pouvez ajouter une mention écrite dans votre document pour la compréhension du signataire
- Go to the “Text Field” block
- Give the text field a title
- Then copy and paste the tag created in this way into your document template.
Attention
Veillez à ne pas couper la balise sur deux lignes
Astuce
Notez que la donnée renseignée dans ces champs ne sera visible que dans le document signé. Aucune mise à jour de donnée n'est réalisé dans les enregistrements Salesforce
Si votre besoin est de collecter de la donnée pour mettre à jour un enregistrement Salesforce, rendez-vous dans la section dédiée aux Interactions