
Gonexa WebDoc
The Gonexa solution to allow you to send your document via a consultation link, retrieve the data entered & obtain a non-certified signature
Building a WebDoc template
A WebDoc template is based on a classic Gonexa Doc template but will include specific tags for the management of fillable fields and the signature.
Prerequisites
⚠️ Be sure to contact support if the licenses are not active for your environment.
- Have installed and configured Gonexa WebDoc
- Have created a Gonexa Doc document template
- Have at least the “Nice” version of the Package (July 2024)
Choosing the shipping method
- Go to the document template in question
- Choose the “WebDoc” sending method
💡 If the “WebDoc” value is not displayed, please manually add to the “WebDoc” value list strictly in the “Available sending methods” field
Set up sending
- From the configuration of your document template, access the WebDoc tab, and click on the Configure button in the “Signers” component
- Copy and paste the email template ID into the Default email template field if you did not enter it in the custom setting
⚠️ The email template must be public and filled in the custom settings, in the document template or at the flow level
💡 To improve the delivery of signature emails, please allow the level of access to all emails from the Salesforce configuration, on the Delivery tab.
- Check the “Schedule recipients” box to define a signature order, so that the second signatory only receives the signature email after the first has signed the document
Choose the order of the signatories: 1 being the first, 2 the second etc...
- Check the “Allow signers to decline signature” box to give signers the option to refuse a signature and to indicate the reason for the refusal
Settings for adding recipients
- From the configuration of your document template, access the WebDoc tab, and click on the Configure button in the “Signers” component
- In the Signers component, click “New” to add a recipient
- Please fill in the following information:
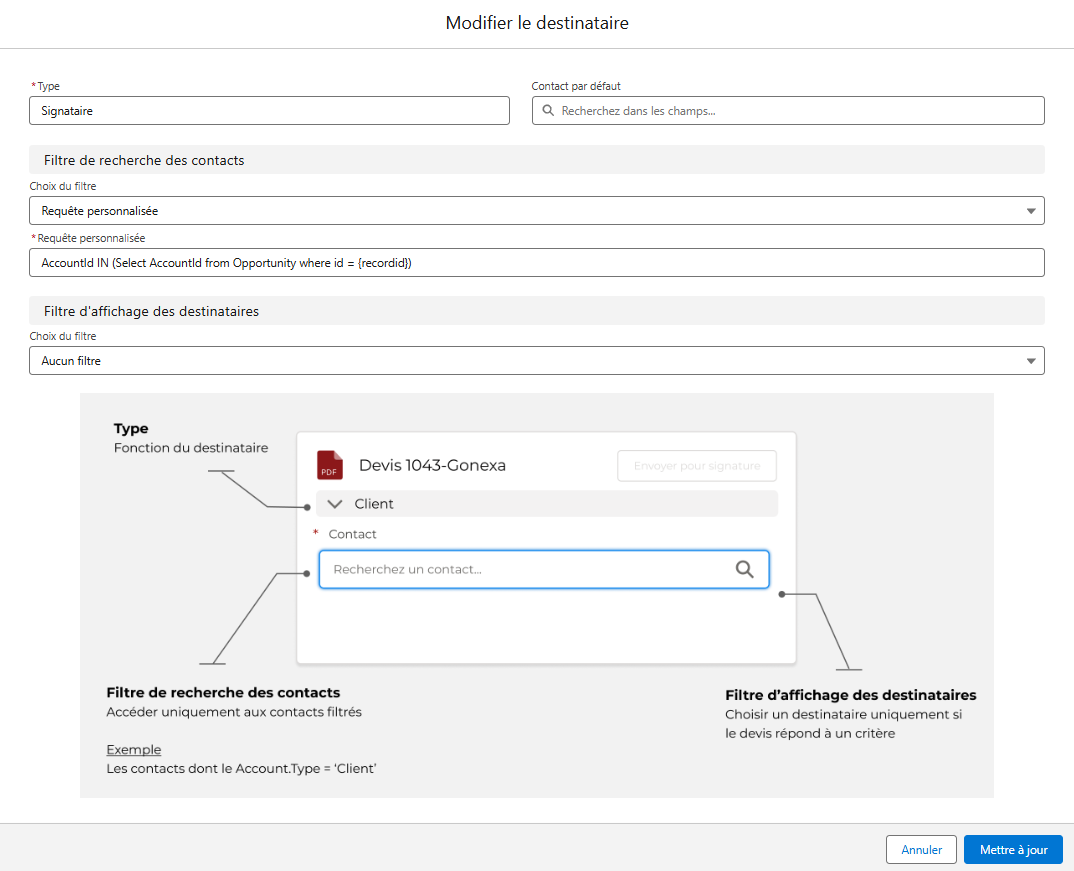
Type:
Function of the recipient to identify him (ex: Customer, Supplier, Partner,...)
Default contact:
The field that references the default contact
Contact search filter:
Allows you to limit the list of signatory contacts
Example: Find the contact on Prospect accounts
Account.Type = 'Prospect'
Signer display filter:
This filter makes it possible not to display the choice of a recipient type in case your business process does not require it.
Example: Show if the Supplier Signature box is checked SupplierSignature__c = 'true'
You can also make a personalized request in order, for example, to have only the contacts from the estimate account.
- Dans ce cas, on choisi “Requête personnalisée” dans le choix du filtre de recherche des contacts
- Then we fill in a nested SOQL query
For example: AccountId IN (Select AccountId from Opportunity where Id = {recordid})
Add recipient tags
- Access your Gonexa Doc document template on which to place the recipient (s)
- Open the Wizard using the “Access Tags” button
- Click on the desired signatory, then copy the signature tag by clicking on “Signature” and paste it into your document where you want
- Then upload the document to Salesforce
Managing the size of the signature location
From the WebDoc tab, go to the “Data to be collected” component in order to find the signatures added to the document. It is possible to customize the size of the signature with the arrow at the end of the line
- On the document template, go to the WebDoc tab
- In “Data to collect”, on the signature tag, click on the arrow, then Edit.
- Choose the width and height of the signature, then save

